

What the module calculates
Horizontal line load gives the vertical stress increase Δσz at a point in the ground below a long line load that pushes along the ground surface, such as the friction of a long wall base, the braking of a rail track or the thrust of an arch. The module also takes a load that is inclined from the vertical: it splits the load into a vertical and a horizontal component, calculates the stress of each by the theory of elasticity for a half-space (the line-load solutions that follow from Boussinesq’s 1885 point load), and adds them. Several loads can be added; the stresses add.
For a load q per unit length at the angle α from the vertical, and a point at the horizontal distance x from the load and the depth z:
The soil is a homogeneous, isotropic, linearly elastic half-space, and the load is flexible, of infinite length along the line, so every cross section is in plane strain. Δσz is the increase caused by the load alone; it does not include the overburden pressure. A horizontal load increases the vertical stress on the side it pushes toward (x > 0) and decreases it on the other side.
What you can describe
- From one to eight line loads, each with its own magnitude q (zero or more, in kN/m), inclination α from the vertical (from −90° to 90°; 90° is a purely horizontal load, 0° a vertical one) and position xL along x. No two loads may stand at the same position.
- One point A below the ground surface, by its horizontal position xA and its depth z.
- The depth of the profile zmax, down to which the stress under A is drawn and tabulated.
The module gives the stress at A and its two parts, the stress of each load when there are several, and the stress against depth under A. It draws the lines of equal stress, colour contours, the profile and a 3D view, writes out the working, and prepares a PDF or Word report.
Which module for which load
- A load that acts straight down on a line: Vertical line load. This module covers it too (α = 0°), but that module is the direct one.
- A concentrated load on a point: Point load.
- A load spread over a width: Vertical strip load, Horizontal strip load, Triangular strip load or Embankment.
- Loaded areas: Circle, any point, Rectangle and Influence chart; layered ground by Westergaard: Westergaard point load and Westergaard areas.
- The module gives the vertical stress increase in the ground. For the lateral pressure a vertical line load puts on a wall, see the Surcharge loads manuals.
Before you start: what you need
Have these ready from your design:
| What | Notes |
|---|---|
| The load q Your design loading | A force per unit length of the line, in kN/m (tf/m or kip/ft in the other unit systems). Zero or more. It is the magnitude of the load along its own direction. |
| The inclination α The direction of the load | The angle from the vertical, from −90° to 90°. It is positive when the horizontal component points toward +x. |
| The position xL Your layout | Along the x axis, in m (or ft). Any value; the first load of the example stands at 0. |
| The point A The place you want the stress | The horizontal position xA on the same axis, and the depth z (at least 0.001 m) below the ground surface. |
| The depth of the profile zmax How deep you want to look | At least 0.1 m. It sets the length of the profile and of its table. |
Quick start in seven steps
- Open the module and choose the units
Open Horizontal line load from the Stresses in a Soil Mass family. Pick SI · kN, SI · tf or US in the header; you can change it at any time.
- Enter the first load
In Line loads press the row of Line load 1 and change its magnitude q, inclination α and position xL. Set α = 90 for a purely horizontal load.
- Add more loads if you have them
Fill the New line load form and press + Add line load; the load goes to the table. Up to eight loads, no two at the same position.
- Place the point A
In Point A type xA and z, or drag A on the Section or Contours drawing.
- Set the depth of the profile
In Depth profile type zmax, or drag the dashed line on the drawing.
- Press Analyze
Press Analyze at the foot of the Model tab. The bar reads Analysed and the loads lock; the point A stays free.
- Read the answer and take the report
The Results tab gives Δσz at A and its parts, the Calculations tab writes out the working, and the Report tab saves a PDF or a Word file.
The screen: four views, chips and dragging
The layout is the one every GeoTerva module shares, described in the workspace guide. The drawing has four views, chosen with the buttons above it, and every view follows your inputs.
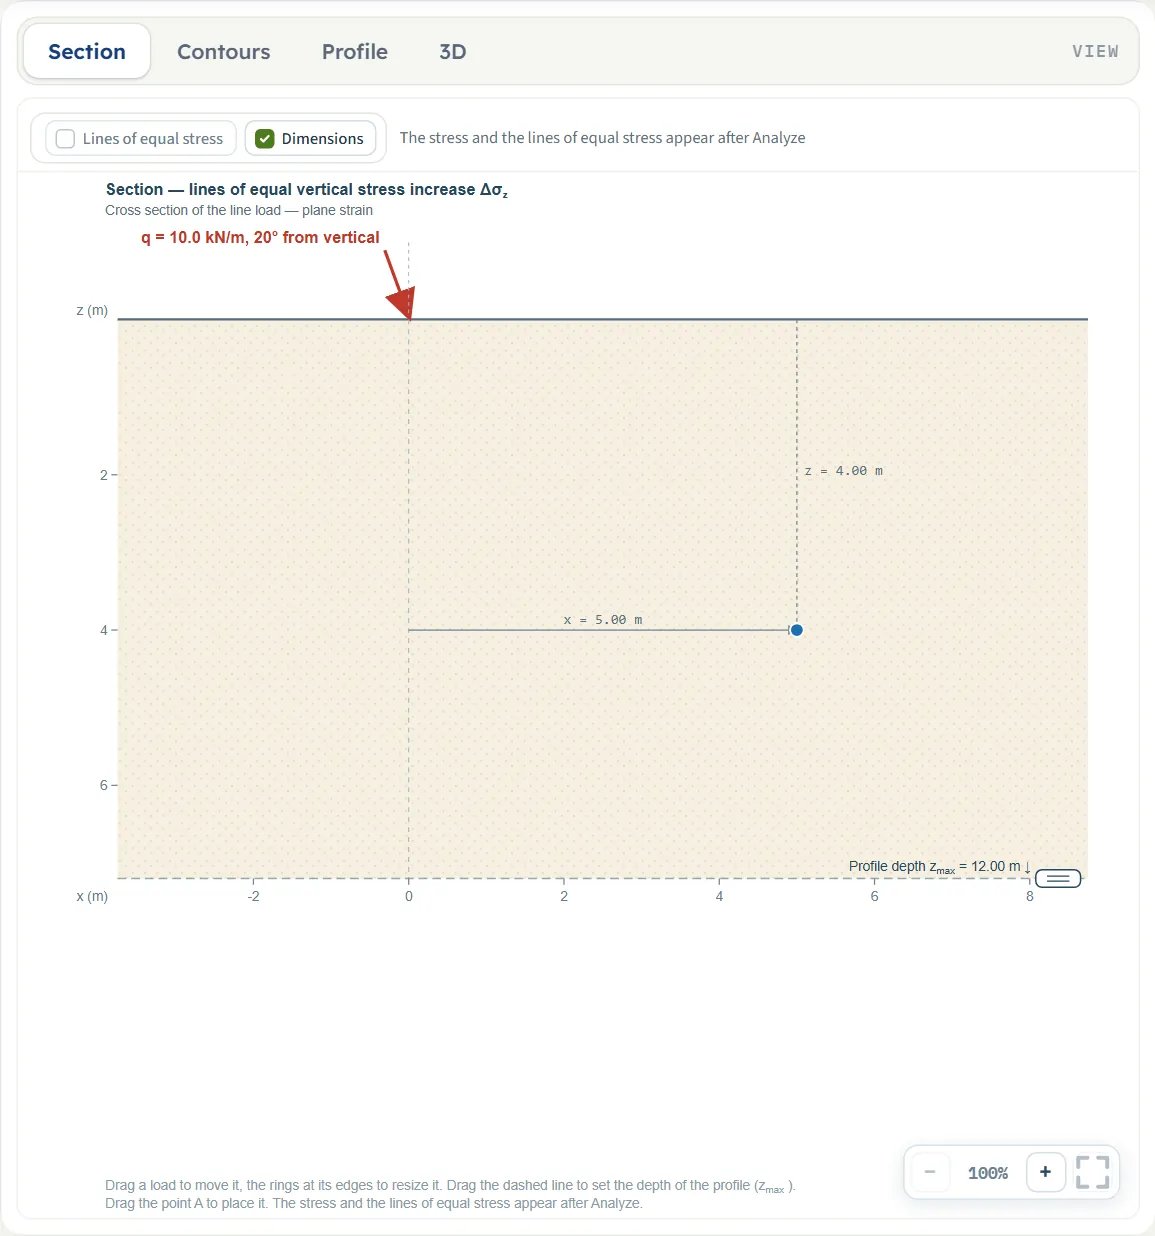
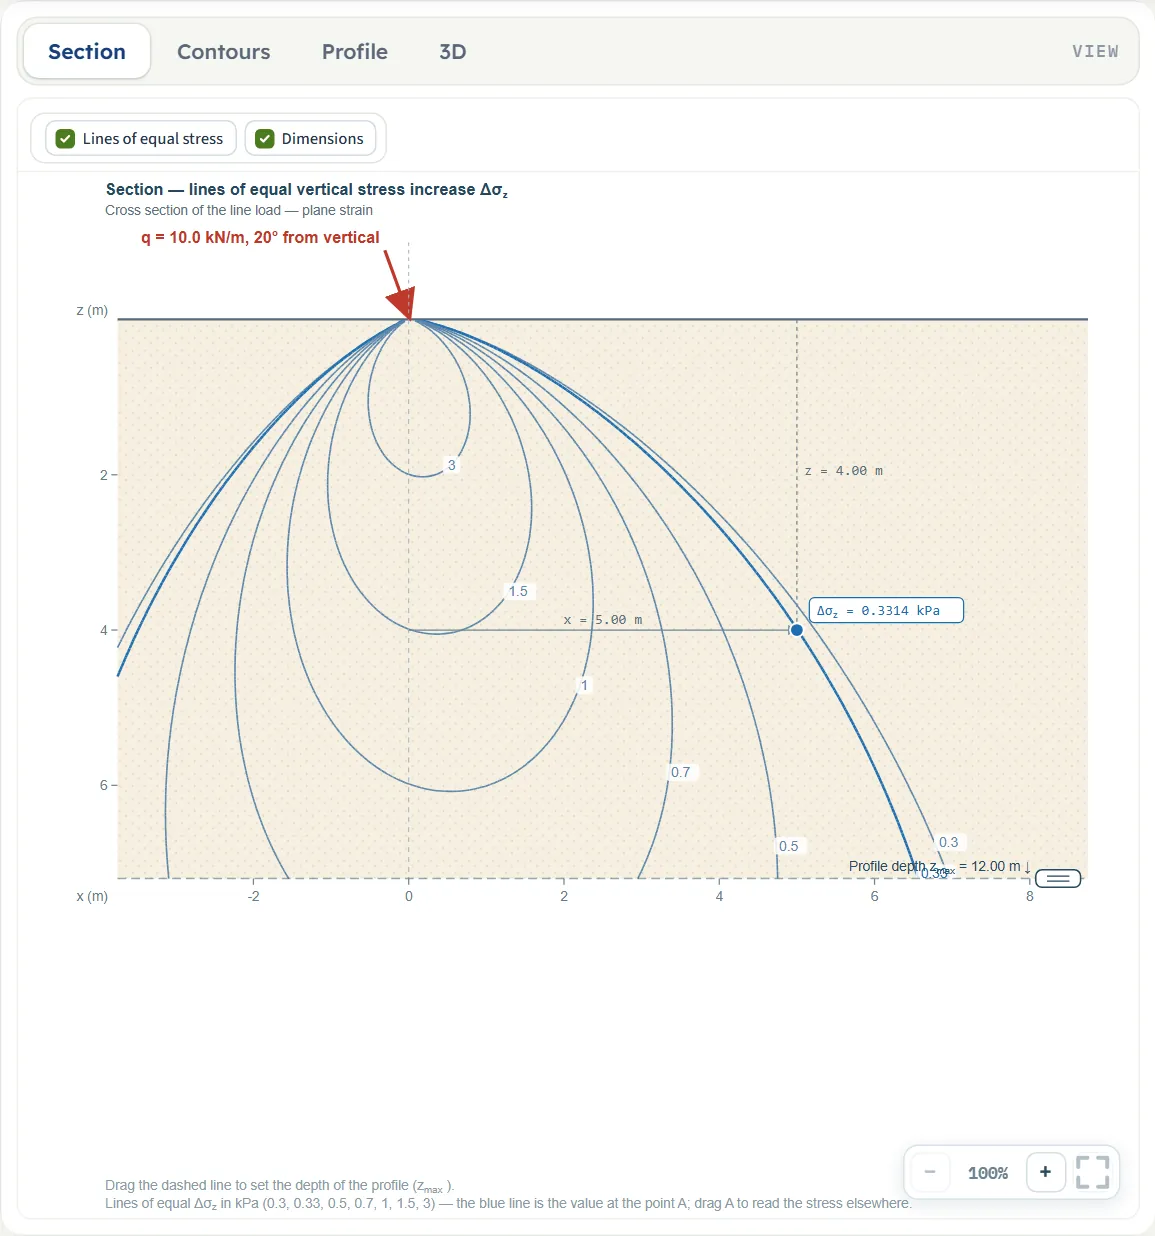
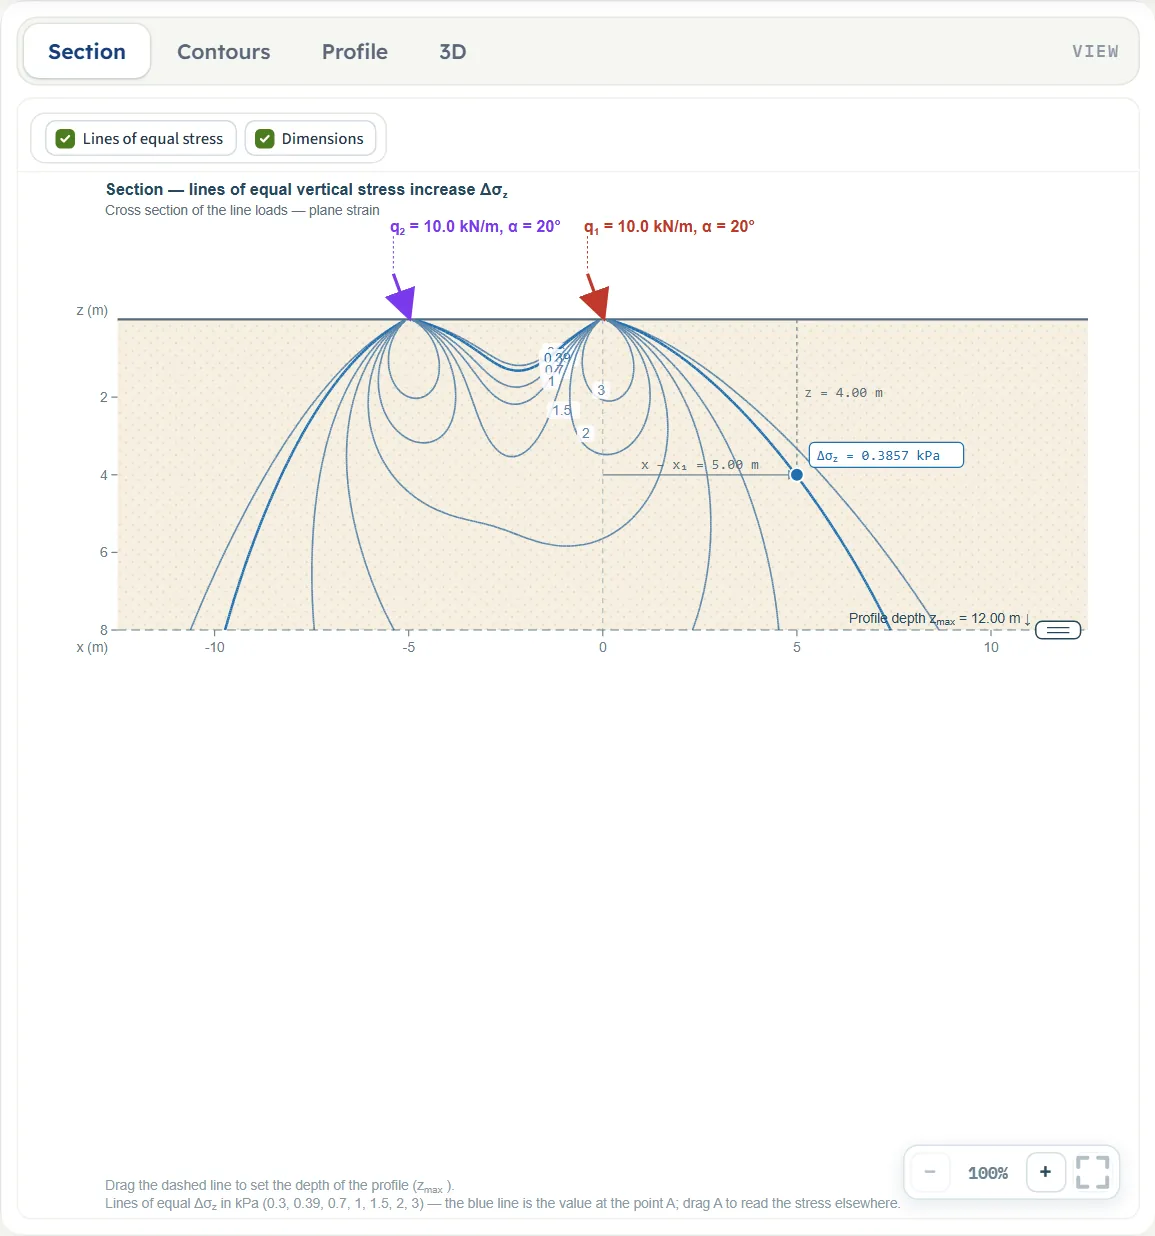
- Section is the cross section of the ground with the load or loads as arrows, the point A with its distances x and z, and the dashed line at the depth of the profile. After Analyze it adds the lines of equal stress Δσz and a label with the value at A; the blue line is the one through A.
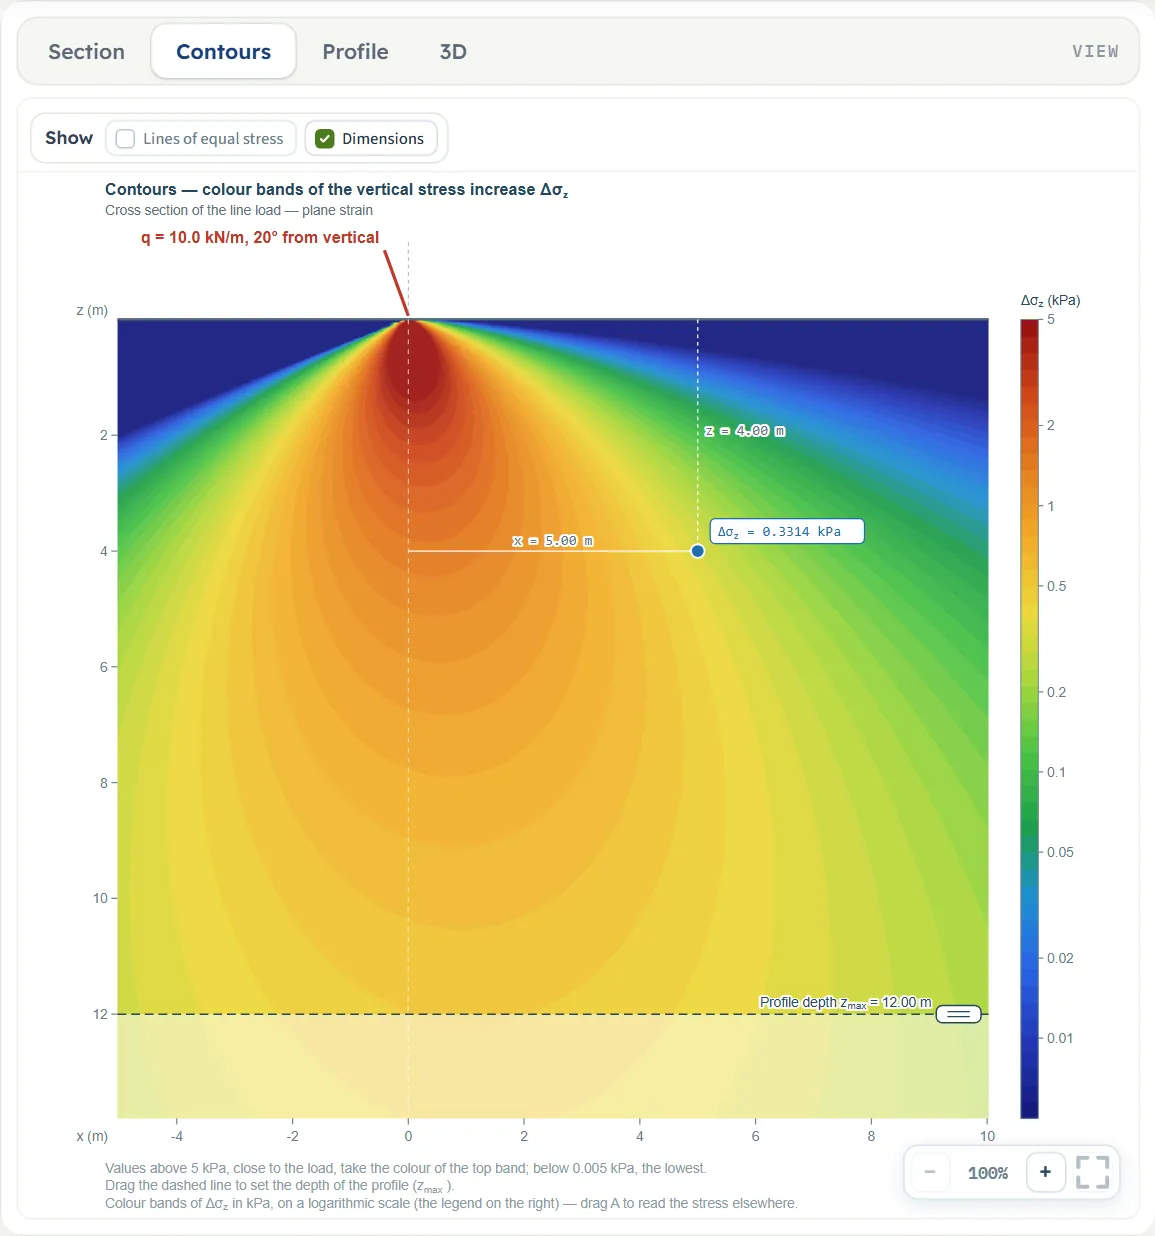
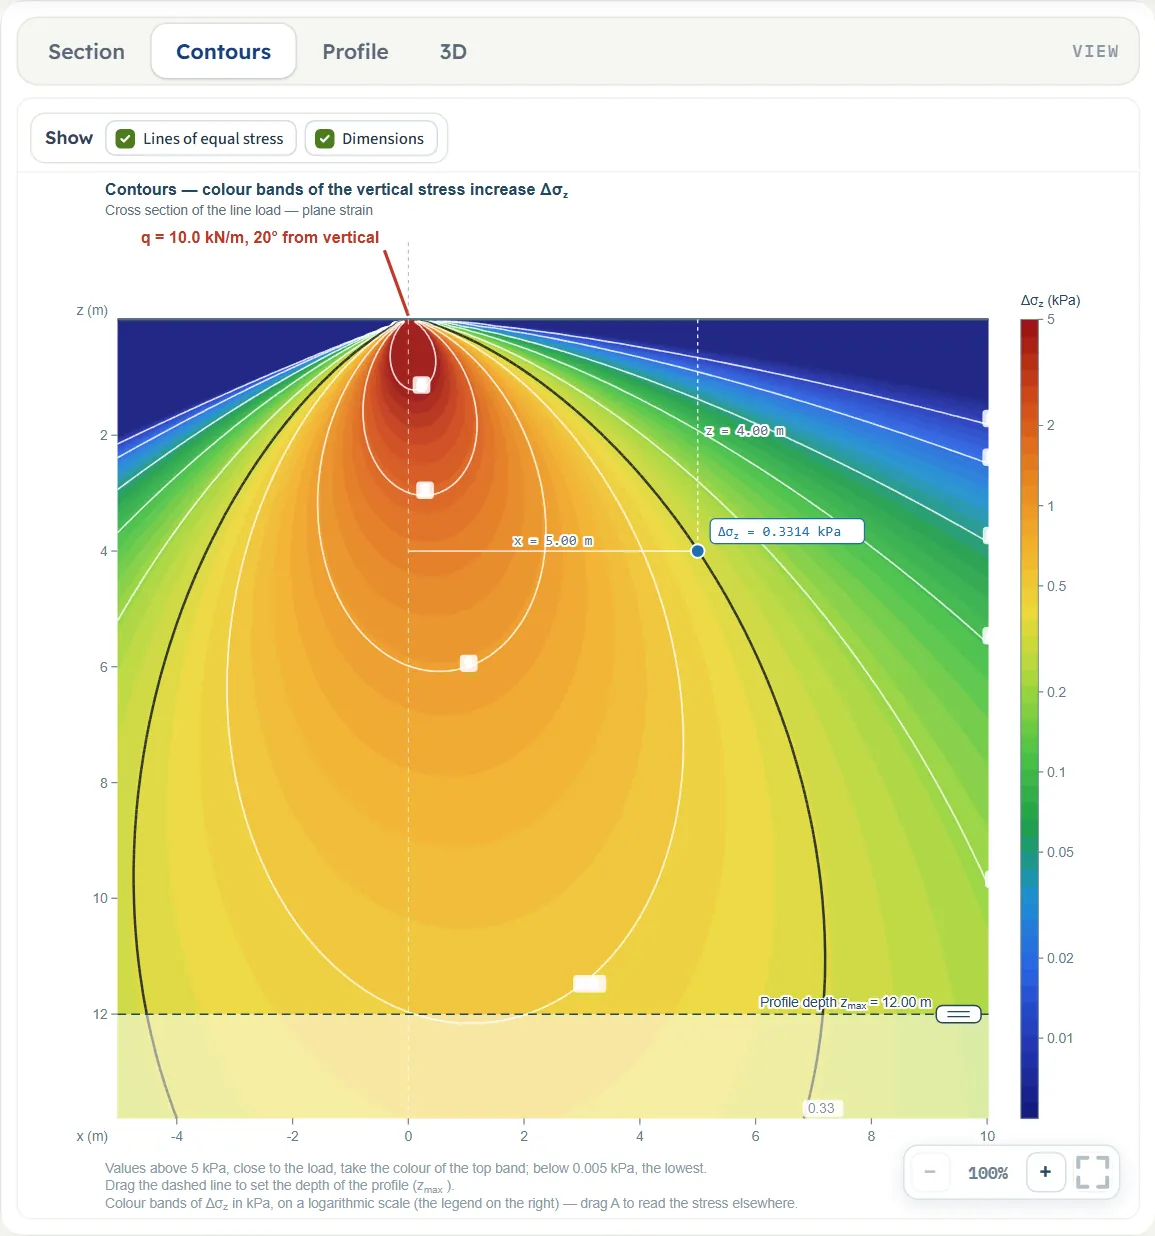
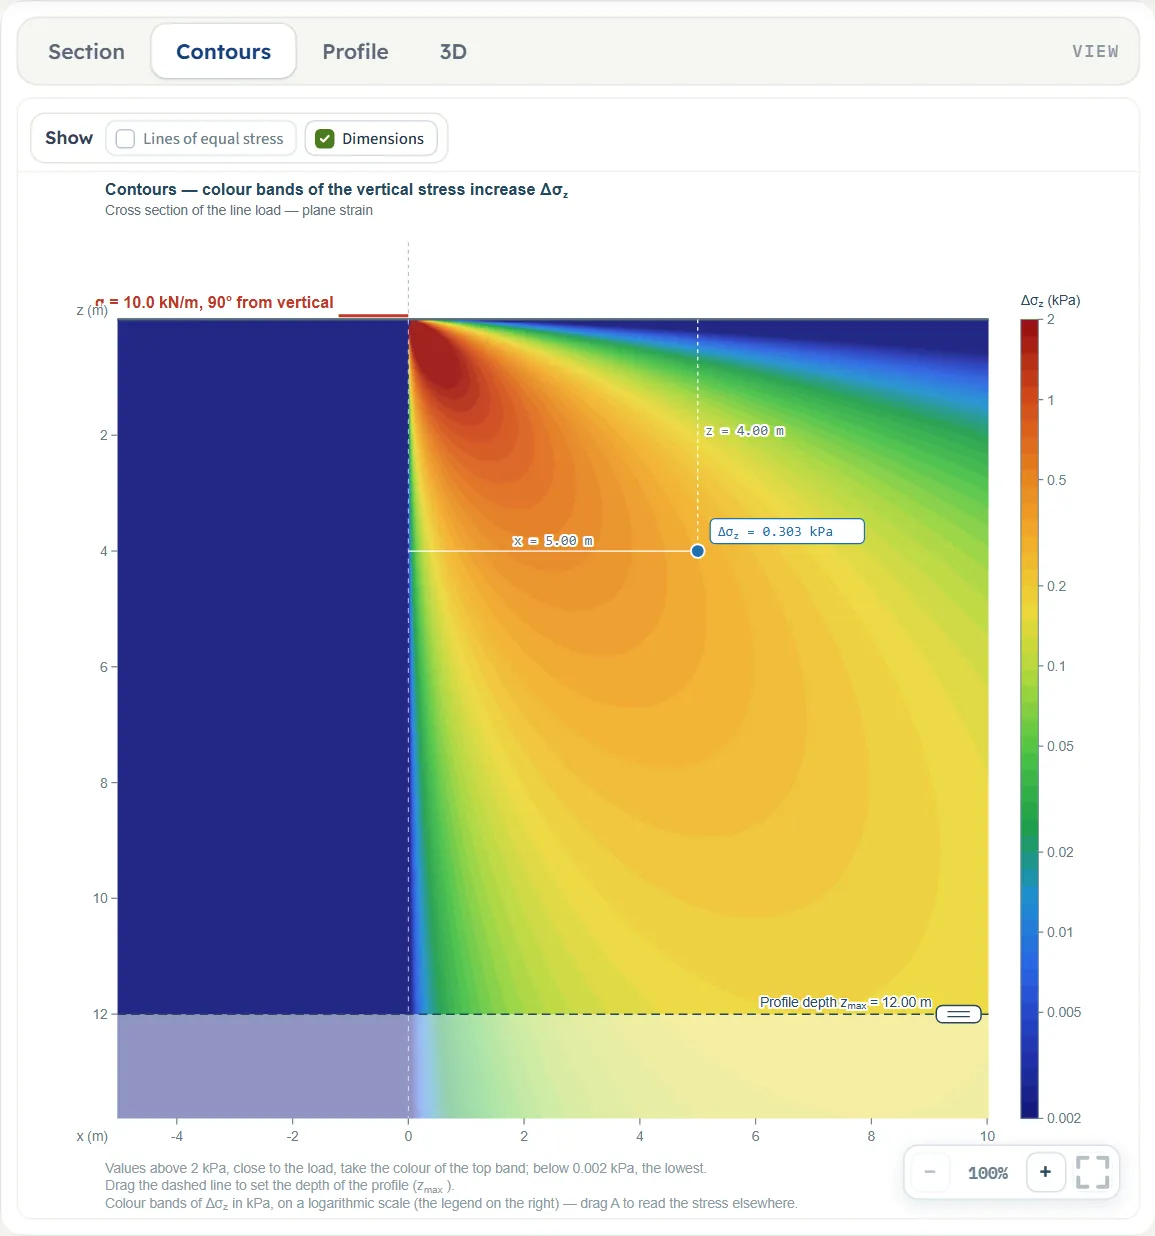
- Contours is the same plane in colour bands on a logarithmic scale, with a legend on the right. Values above the top band take its colour, values below the lowest band take the lowest.
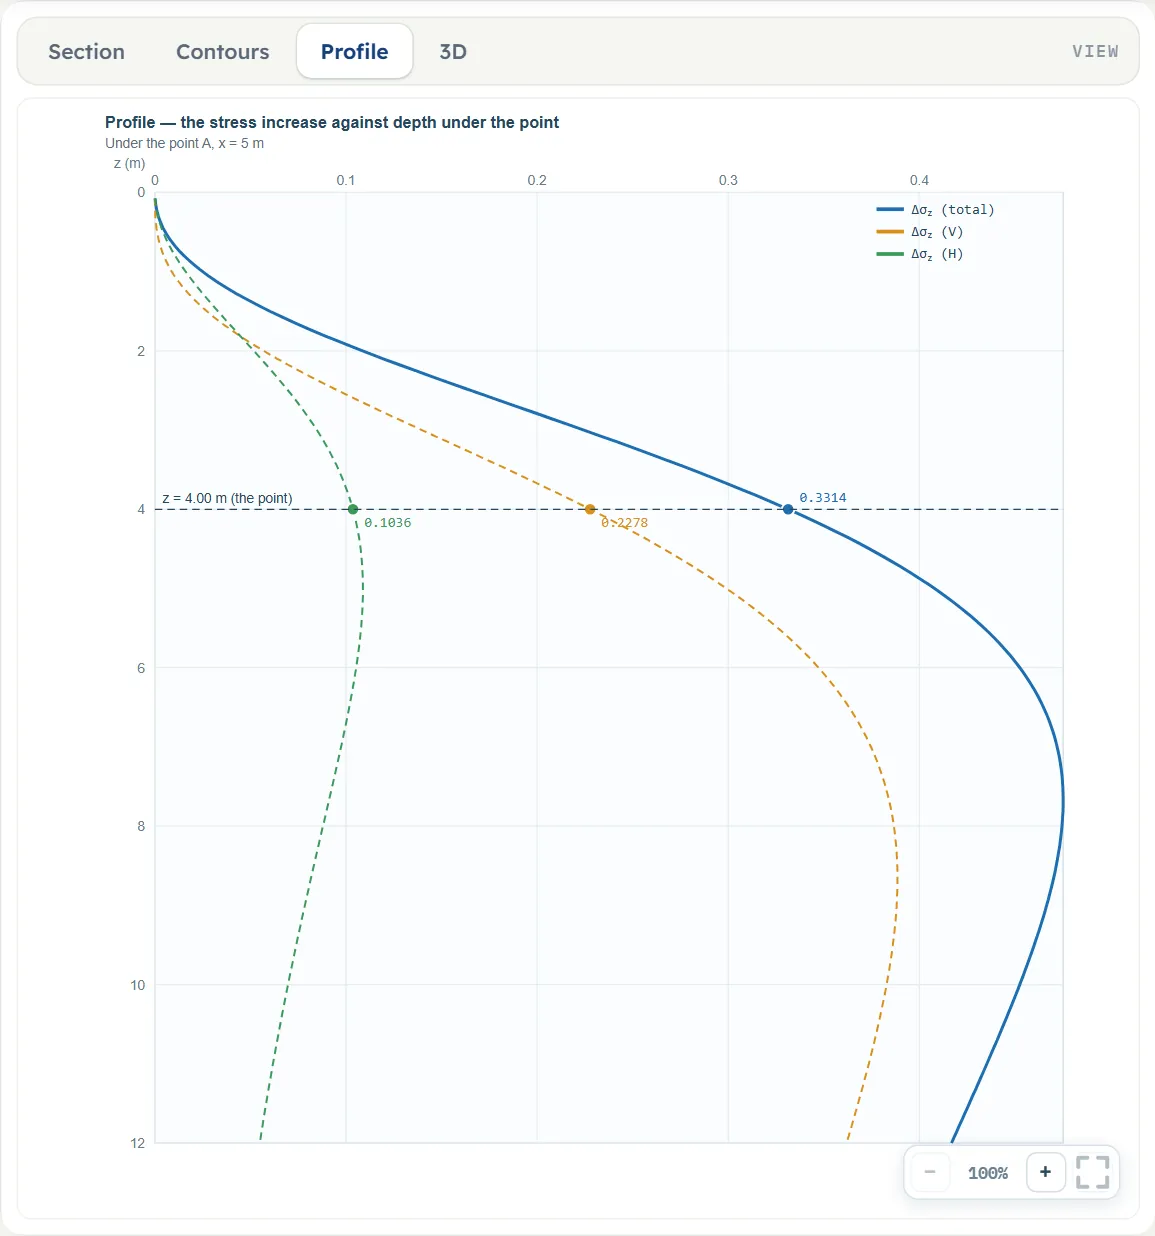
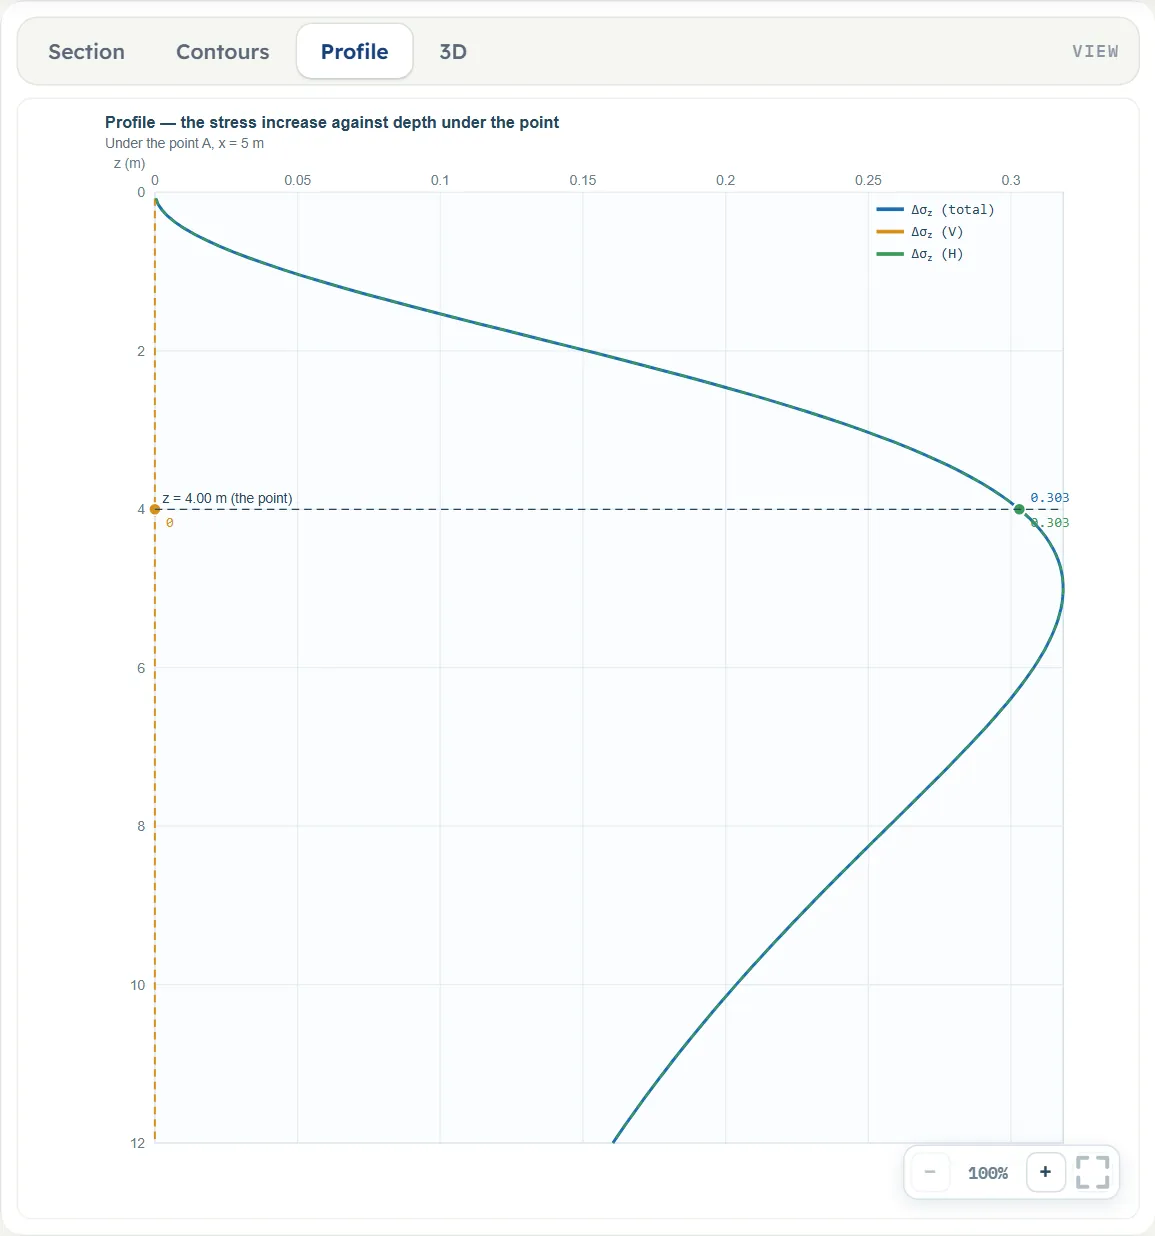
- Profile is the stress against depth under A: the total Δσz as a solid line and its vertical and horizontal parts as dashed lines, with the values at A marked. It appears after Analyze.
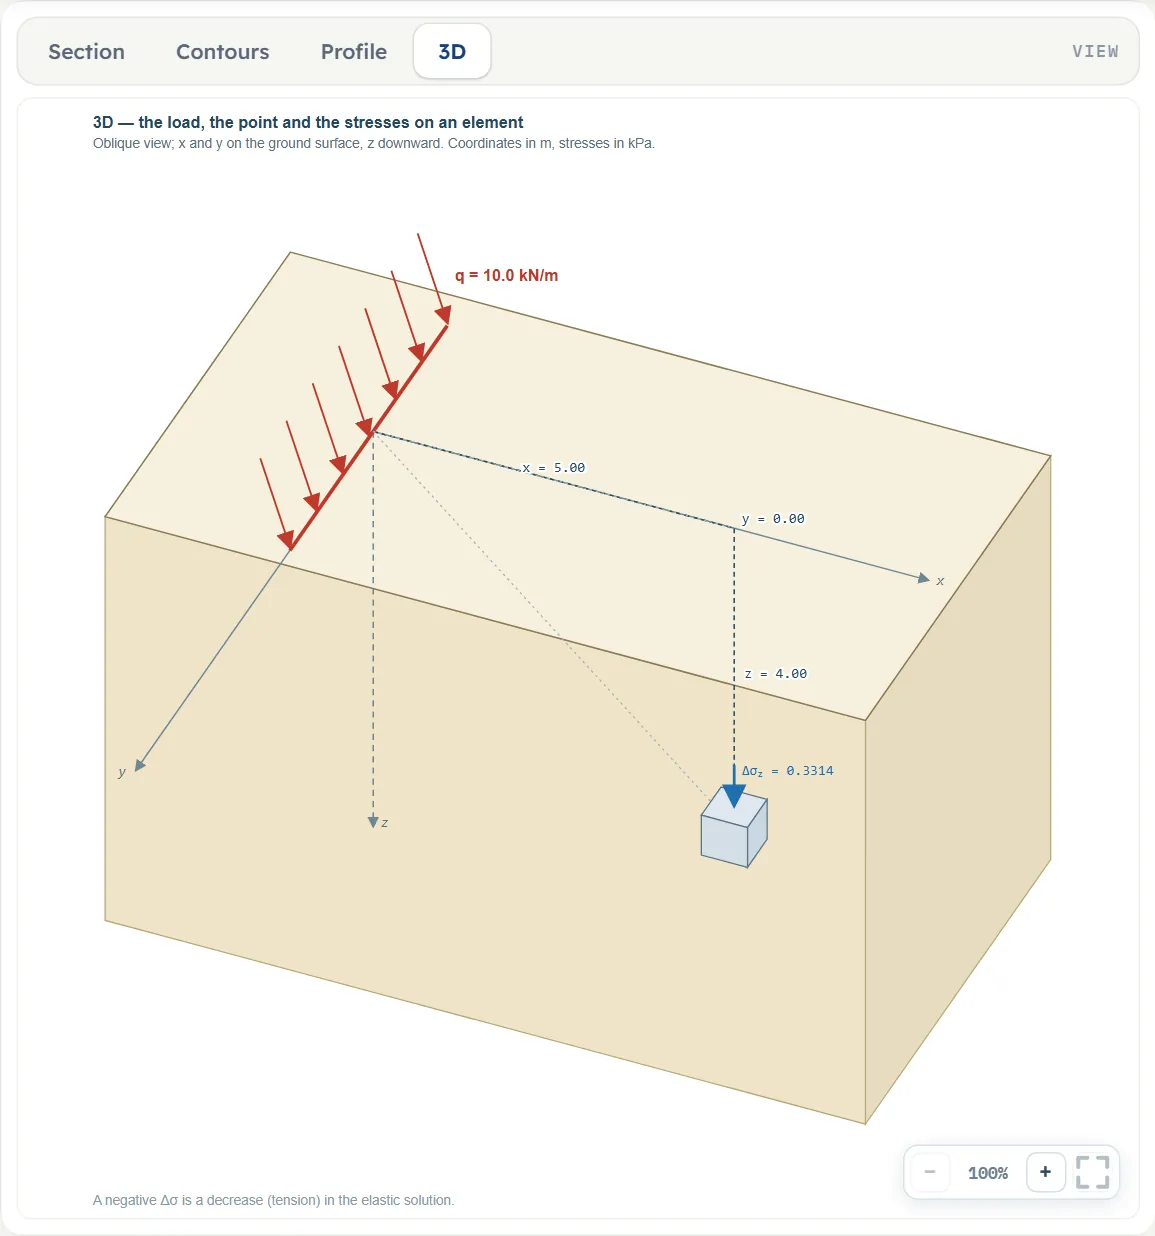
- 3D is an oblique view of the ground with the line load, the coordinates of A and a small element at A with the stress on it. After Analyze it shows Δσz; a note says that a negative value is a decrease (tension) in the elastic solution.
The Show chips
The Section view has two chips: Lines of equal stress and Dimensions. The Contours view has the same two under a Show label. Dimensions is on from the start. Lines of equal stress is dimmed until Analyze; then it comes on in the Section view, while in the Contours view it stays off until you tick it. Before Analyze the Section view says “The stress and the lines of equal stress appear after Analyze” and the Contours view says “The colour contours of the stress appear after Analyze”. The Profile and 3D views have no chips.
Dragging on the drawing
- A load is dragged along x in the Section, Contours and 3D views, before Analyze. Its position xL follows in steps of 0.05 m. A pull that would put the load on another one stops at the last free place, with the message “Another line load already stands at this position — the value is kept as it was.” The drawing has no limit on how far you can pull; the picture rescales.
- The point A is dragged in the Section and Contours views, before and after Analyze. xA and z follow in steps of 0.05 m, and a drag does not take A above 0.05 m depth. After Analyze the stress at the new place is calculated at once.
- The dashed line at the foot of the Section and Contours views sets the depth of the profile zmax. In the Section view it stands at the foot of the drawing, about 7 m deep for the example, when zmax is deeper; the Contours view shows the true depth. It moves in steps of 0.05 m (a drag does not take it shallower than 0.5 m) and stays free after Analyze.
- After Analyze the loads are locked: they have no handles. Edit inputs unlocks them and clears the results.
Zoom
Each view has −, a percentage and + at the lower right, and a button that fits the whole drawing in the pane. The mouse wheel zooms as well.
Entering the model, section by section
The Model tab has four sections: Model data, Line loads, Point A and Depth profile. Each opens when you click its title; Next and Back at the foot walk you through them, and Analyze waits below. Where a unit is shown twice or three times, such as m · ft, the units are those of SI · kN, SI · tf and US in turn, and equal ones are merged. Defaults are shown in SI; in US the boxes show the converted values, for example 0.685218 kip/ft for the 10 kN/m load and 16.4042 ft for 5 m.
Model data
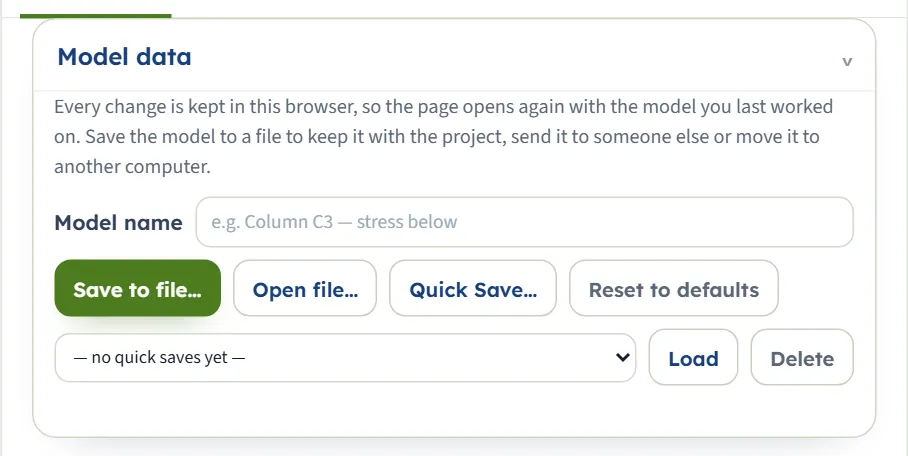
The first section holds the model name, Save to file…, Open file…, Quick Save… with its list and Load and Delete, and Reset to defaults. It works as described in the workspace guide. These buttons stay available after Analyze.
Line loads
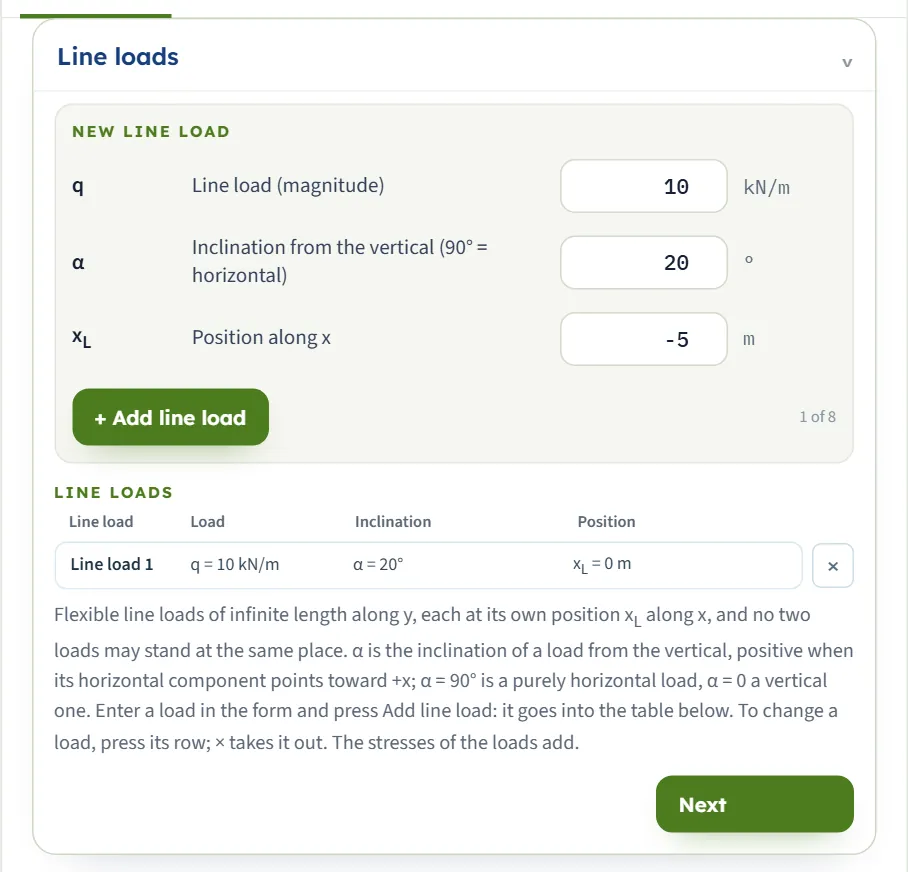
The section is a form over a table. The New line load form takes the magnitude, the inclination and the position of one load; + Add line load puts it at the bottom of the table, and a counter beside the button shows how many of the eight loads there are. The Line loads table lists each load with its three values. Press a row to change that load in the form (the form then reads Editing · Line load 1, offers Done and Delete line load, and says “Changes apply as they are entered.”); × takes a load out. With one load left, both delete buttons are dimmed. The form for a new load starts from 10 kN/m, 20° and −5 m; the first load of the example stands at 0 m.
| Field | Default | What to enter |
|---|---|---|
| Line load (magnitude) q kN/m · tf/m · kip/ft | 10 (form: 10) | Zero or more. The load along its own direction, per unit length of the line. |
| Inclination from the vertical (90° = horizontal) α ° | 20 (form: 20) | From −90° to 90°. Positive when the horizontal component points toward +x; 0° is vertical and 90° purely horizontal. |
| Position along x xL m · ft | 0 (form: −5) | Any value. No two loads may stand at the same position. |
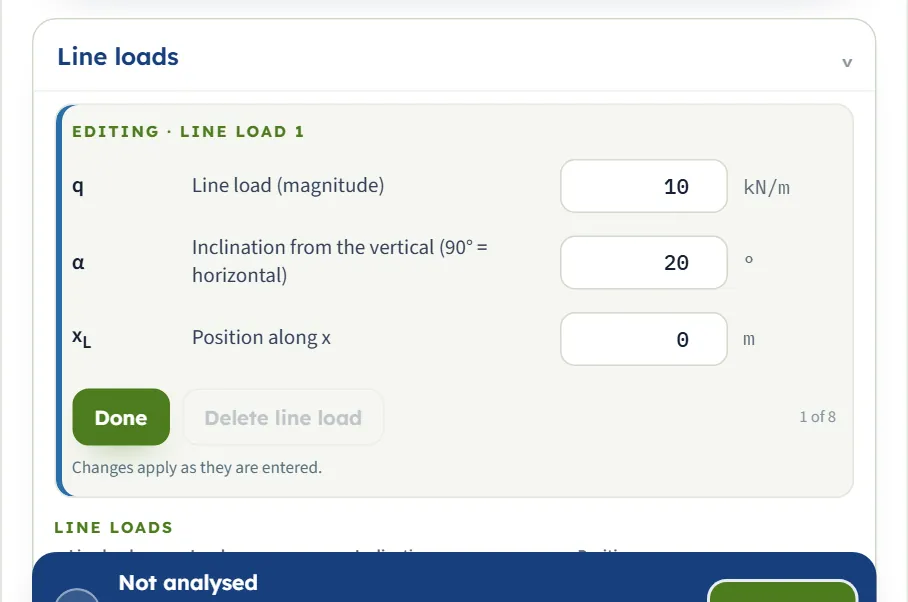
Two loads cannot stand at the same position. Adding a load at the position of another gives the message “A line load already stands at this position. Give the new one another position.”, and changing a position to one that is taken gives “Another line load already stands at this position — the value is kept as it was.”
Point A
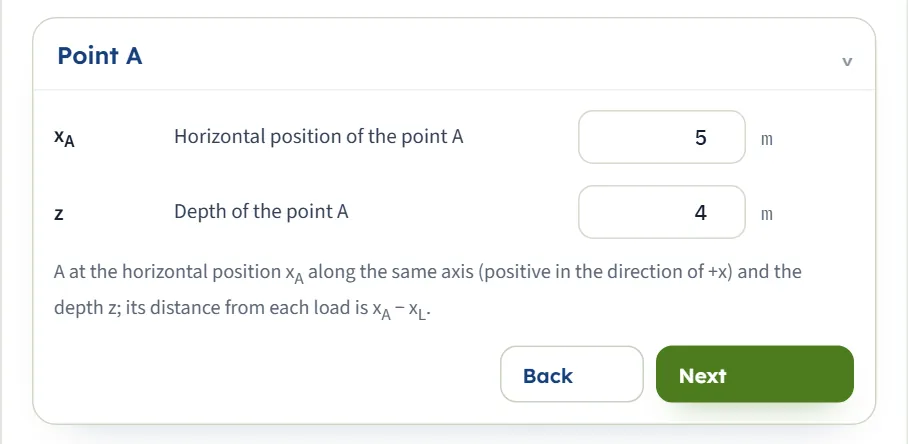
The point where you want the stress. Its horizontal position is on the same axis as the loads, positive toward +x; its distance from a load is xA − xL. Place it by typing, or drag it on the Section or Contours drawing.
| Field | Default | What to enter |
|---|---|---|
| Horizontal position of the point A xA m · ft | 5 | Any value, on the same axis as the loads; its distance from a load is xA − xL. |
| Depth of the point A z m · ft | 4 | At least 0.001 m. The stress is calculated inside the ground, not on the surface. |
Depth profile
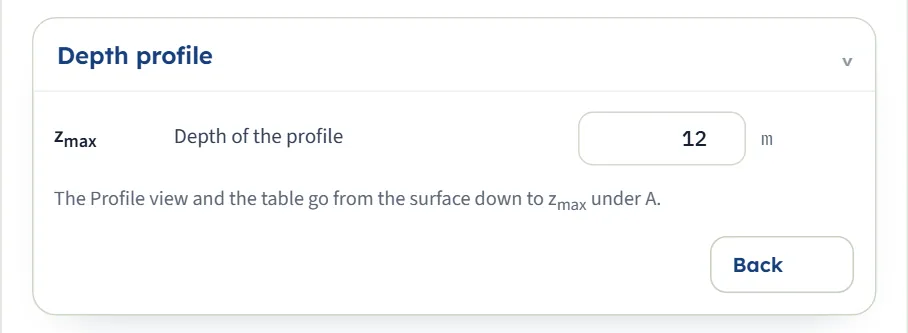
The profile view and its table go from the surface down to zmax under A. The table goes down to zmax (or to z if that is deeper), with the row of A marked; the drawing may run a little deeper when A is close to zmax.
| Field | Default | What to enter |
|---|---|---|
| Depth of the profile zmax m · ft | 12 | At least 0.1 m. The profile and its table go from the surface down to zmax under A (to z if that is deeper). |
Choosing the inclination and the side of the point
Two decisions shape the answer: the direction of each load, and which side of it the point A lies on. Both come down to signs.
| Input | Effect | Rule |
|---|---|---|
| α = 0° | A vertical load | Only the vertical component acts, and the stress is symmetric about the load. The example load gives Δσz = 0.2424 kPa at A. |
| α from 0° to 90° | The load leans toward +x | The horizontal part Δσz(H) is positive for x > 0, so it adds to the vertical part on that side and subtracts on the other. At 45°, Δσz = 0.3856 kPa at A. |
| α = 90° | A purely horizontal load | The vertical part is zero. Δσz = 0.3030 kPa at A, and zero straight below the load (x = 0). |
| α negative | The load leans toward −x | The horizontal part changes sign. At −20°, Δσz = 0.1241 kPa at A, and at −90° it is -0.3030 kPa. |
The side of the point matters in the same way. With the load of the example, moving A from x = 5 m to x = −5 m, at the same depth, takes Δσz(H) from 0.1036 to -0.1036 kPa and Δσz from 0.3314 to 0.1241 kPa; the vertical part, 0.2278 kPa, is the same on both sides.
Which should I pick?
- Take the direction of the load from your design. A load that pushes toward +x has a positive α; place your x axis so that this holds.
- Check the sign on the result. A negative Δσz is a decrease of the vertical stress in the elastic solution. The 3D view says so under the drawing, and the note under the Results cards says on which side a horizontal load decreases the stress.
- One load with α = 0 and one with α = 90 at the same place cannot be entered, since two loads cannot stand at one position. Use one inclined load instead; it gives the same stress.
Analyze and read the results
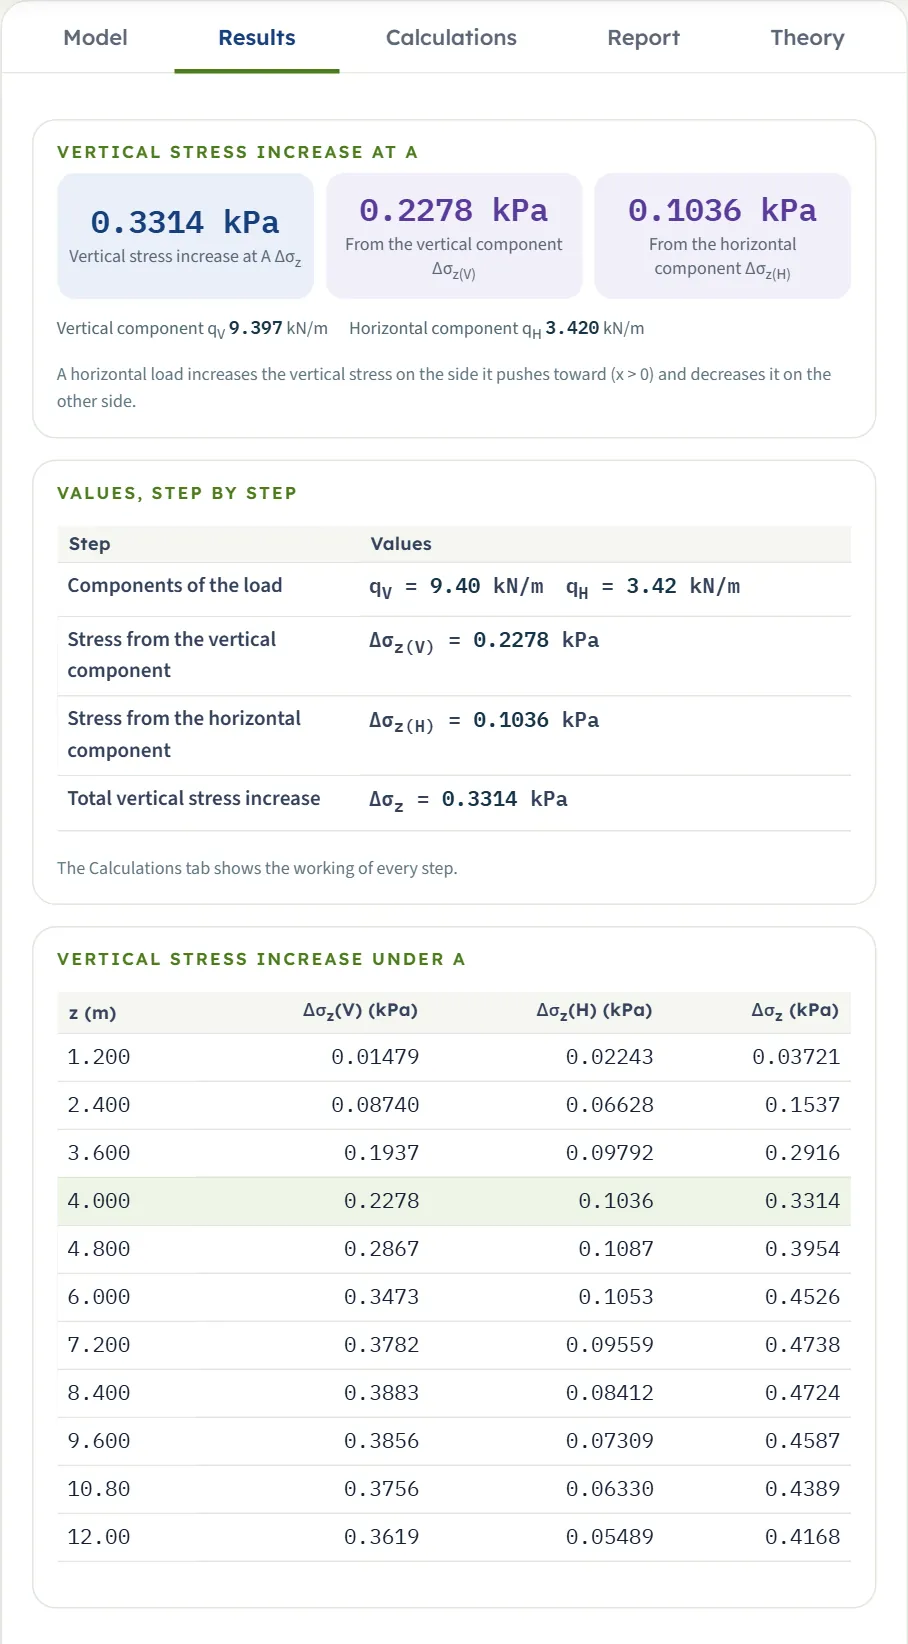
Press Analyze. The bar changes to Analysed — the stress at the point calculated and says “The inputs are locked. Edit inputs clears the results; the unit system can still be changed. The point A stays free: drag it on the drawing or change its coordinates, and the stress there is calculated at once.” The Model tab stays on screen; open the Results tab for the answer, and the drawings show the lines, the contours, the profile and the element.
| Card | Symbol | The example |
|---|---|---|
| Vertical stress increase at A | Δσz | 0.3314 kPa |
| From the vertical component (components) | Δσz(V) | 0.2278 kPa |
| From the horizontal component (components) | Δσz(H) | 0.1036 kPa |
| Vertical component (one load only) | qV | 9.397 kN/m |
| Horizontal component (one load only) | qH | 3.420 kN/m |
With several loads the cards read “From the vertical components” and “From the horizontal components”, and a card From line load k is added for each load (up to three loads; the working of every load is in the Calculations tab). Below the cards, Values, step by step lists each step, and Vertical stress increase under A is a table of z, Δσz(V) , Δσz(H) and Δσz at ten equal depths down to zmax, with the row of A marked.
Using the numbers
- Δσz is the increase caused by the loads, in kPa (t/m² or ksf in the other unit systems). Add the stress already in the ground to it for the total.
- The loads are per unit length: the stress is the same along the whole line, in every cross section.
- The depth of the profile does not change the answer at A.
- Changing the unit system after Analyze restates the cards without a new run. Edit inputs unlocks the loads and clears the results.
Warnings
The green bar carries a Warnings (0) button. It opens a window that says “No warnings — the assumptions of the solution hold for these inputs.” This solution has no warnings of its own: the button reads Warnings (0), also when the stress is negative.
The Calculations tab, the report and the Theory tab
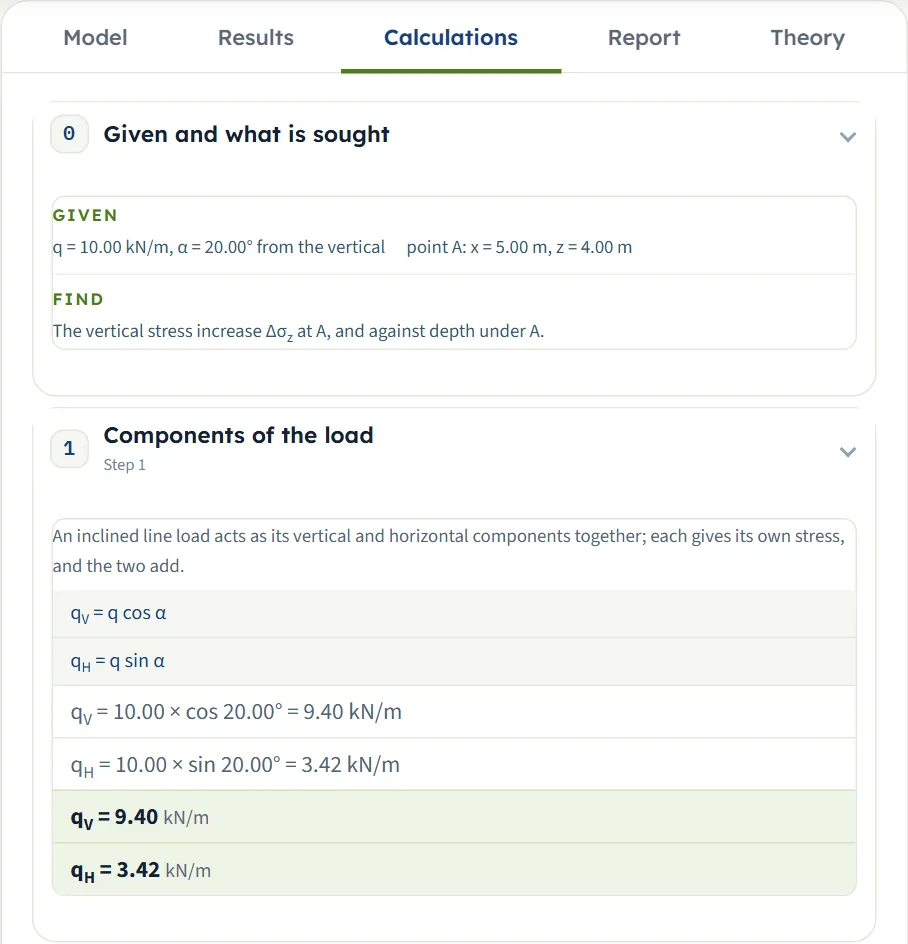
The Calculations tab opens with Given and what is sought, then writes out the working in numbered steps. With one load there are five:
- Components of the load — qV = q cos α and qH = q sin α with your numbers.
- Stress from the vertical component — x/z, the ratio Δσz(V) / (qV/z) and Δσz(V) .
- Stress from the horizontal component — the same for Δσz(H) .
- Total vertical stress increase — Δσz = Δσz(V) + Δσz(H) .
- Stress increase against depth — the table under A, with the row of A marked, and the answer.
With several loads, each load has a step of its own (“Stress from line load k”, with its distance x = xA − xL), followed by a Superposition step that adds them, and the depth step.
The report
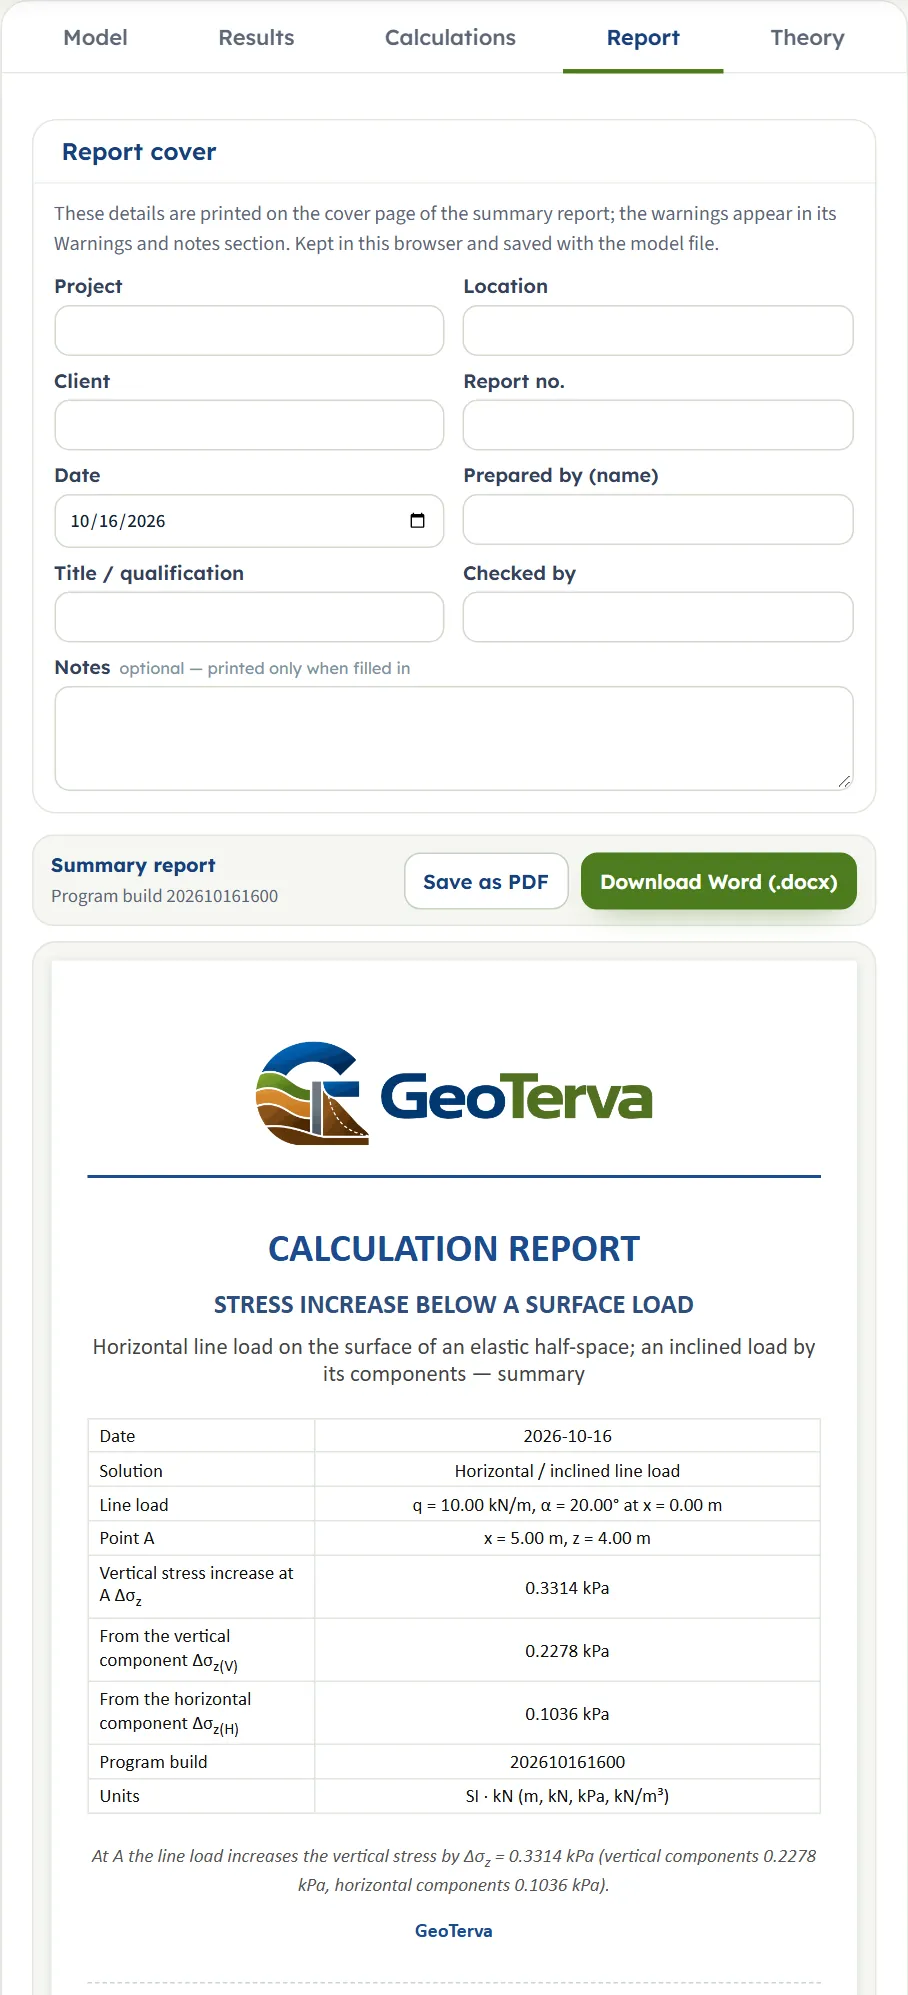
In the Report tab fill in the cover (project, location, client, report number, date, prepared by, title or qualification, checked by, and optional notes). The details are kept in this browser and saved with the model file. Save as PDF and Download Word (.docx) produce the summary report; the preview below the buttons is the report itself.
The report has six parts: 1 Introduction and scope, 2 Input data, 3 Calculation (3.1 Components of the load, 3.2 and 3.3 the stress of each component, 3.4 the total and 3.5 the stress against depth), 4 Results, 5 Summary and 6 References. It carries the section, profile and 3D drawings and states the units used.
The Theory tab
The Theory tab has four sections: Scope and assumptions, The vertical stress, An inclined line load, and References. Each opens when you click its title, and the figures in it are computed from the equations; the third works the example through.
Worked example: the module’s own example
The module opens on this example, so you can follow the numbers on your own screen.
| Section | Input | Value |
|---|---|---|
| Line loads | Line load 1 | q = 10 kN/m; α = 20° from the vertical; xL = 0 |
| Point A | Position and depth | xA = 5 m; z = 4 m |
| Depth profile | Depth | zmax = 12 m |
Step 1: the components
qV = 10 × cos 20° = 9.397 kN/m and qH = 10 × sin 20° = 3.420 kN/m.
Step 2: the stress of each component
The distance of A from the load is x = 5 − 0 = 5 m, so x/z = 1.250. For the vertical part, Δσz(V) / (qV/z) = 2 / {π[(1.25)² + 1]²} = 0.09695, so Δσz(V) = 0.09695 × 9.397 / 4 = 0.2278 kPa. For the horizontal part, Δσz(H) / (qH/z) = 2 × 1.25 / {π[(1.25)² + 1]²} = 0.1212, so Δσz(H) = 0.1212 × 3.420 / 4 = 0.1036 kPa.
Step 3: the total
These are the three cards of the Results tab. The same sum at other depths under A gives the table of the profile, for example 0.3314 kPa at 4.000 m, 0.4526 kPa at 6.000 m and 0.4168 kPa at 12.00 m; the stress under A rises to a largest value of about 0.47 kPa near 7 to 8 m and then falls.
Two loads
Add a second load with the form’s defaults (10 kN/m, 20°, at −5 m). Its distance from A is 10 m and it gives 0.05434 kPa; with the first load’s 0.3314 kPa the total is 0.3857 kPa (vertical parts 0.2562 kPa, horizontal parts 0.1295 kPa). The Section view then shows both loads, each in its own colour, with their combined lines of equal stress.
Other unit systems
The default example in SI · tf gives Δσz = 0.03379 t/m² (the load is 1.01972 tf/m), and in US 0.006921 ksf (the load is 0.685218 kip/ft): the same problem in other units. Three checks by hand, all independent of the module:
- Vertical load, A below it. q = 10 kN/m, α = 0, A at xA = 0 and z = 4 m: Δσz = 2q/(πz) = 2 × 10 / (π × 4) = 1.592 kPa. The module gives 1.592 kPa.
- US. q = 2 kip/ft, α = 0, A below it at 10 ft: 2 × 2 / (π × 10) = 0.1273 ksf. The module gives 0.1273 ksf.
- SI · tf. q = 5 tf/m, α = 90°, x = 3 m, z = 3 m: Δσz = 2 × 5 × 3 × 3² / [π (3² + 3²)²] = 270 / (π × 324) = 0.2653 t/m². The module gives 0.2653 t/m².
How each input changes the answer
Each row changes one thing in the example (one load of 10 kN/m at 20° at xL = 0, A at xA = 5 m and z = 4 m) and runs the module again. The numbers are the ones the module gives, so you can reproduce any row. Δσz is in kPa; the parts are under each row.
| Change | Δσz (kPa) |
|---|---|
| The example: 10 kN/m at 20°, xL = 0; A at 5 m and 4 m The reference Vertical part 0.2278 · horizontal part 0.1036 kPa | 0.3314 |
| q = 20 kN/m Twice the load: twice the stress Vertical part 0.4555 · horizontal part 0.2072 kPa | 0.6628 |
| α = 0° (vertical) Only the vertical part Vertical part 0.2424 · horizontal part 0 kPa | 0.2424 |
| α = 45° The horizontal part grows, the vertical part falls Vertical part 0.1714 · horizontal part 0.2142 kPa | 0.3856 |
| α = 90° (horizontal) Only the horizontal part Vertical part 0 · horizontal part 0.3030 kPa | 0.3030 |
| α = −20° The horizontal part changes sign and subtracts Vertical part 0.2278 · horizontal part -0.1036 kPa | 0.1241 |
| α = −90° A horizontal load pushing away from A: a decrease Vertical part 0 · horizontal part -0.3030 kPa | -0.3030 |
| A at xA = 10 m Farther from the load: much smaller Vertical part 0.02845 · horizontal part 0.02589 kPa | 0.05434 |
| A at xA = 2 m Nearer the load Vertical part 0.9572 · horizontal part 0.1742 kPa | 1.131 |
| A at xA = 0 (under the load) The horizontal part is zero Vertical part 1.496 · horizontal part 0 kPa | 1.496 |
| A at xA = −5 m (the other side) The vertical part is the same; the horizontal part is negative Vertical part 0.2278 · horizontal part -0.1036 kPa | 0.1241 |
| A at z = 2 m Shallower: smaller at this distance Vertical part 0.05691 · horizontal part 0.05178 kPa | 0.1087 |
| A at z = 8 m Deeper: larger at this distance Vertical part 0.3867 · horizontal part 0.08796 kPa | 0.4746 |
| Load moved to xL = 2 m A is 3 m from the load: larger Vertical part 0.6126 · horizontal part 0.1672 kPa | 0.7798 |
| Load moved to xL = 5 m The load is above A: the horizontal part is zero Vertical part 1.496 · horizontal part 0 kPa | 1.496 |
| α = 90° with A at xA = −5 m A decrease of the vertical stress Vertical part 0 · horizontal part -0.3030 kPa | -0.3030 |
| A second load of 10 kN/m, 20°, at xL = −5 m The stresses add Vertical part 0.2562 · horizontal part 0.1295 kPa | 0.3857 |
| Two more loads: (10 kN/m, 20°, −5 m) and (5 kN/m, 0°, 8 m) The stresses of the three loads add Vertical part 0.5822 · horizontal part 0.1295 kPa | 0.7117 |
The pattern follows the formulas. The stress is proportional to the load, so twice the load gives twice the stress. At the default 20° the vertical part is the larger one under and near the load, but the balance depends on α and on x/z; the horizontal part changes sign with x. Far from the load both fall. A point on the other side of a horizontal load, or a load that pushes away from the point, gives a decrease. Moving the point deeper does not always raise the stress: at this distance the stress under A rises with depth down to about 7 to 8 m and then falls.
Messages: when the module stops, and what it notes
The module checks the numbers it needs before it calculates. When one cannot be used it stops, and nothing is calculated.
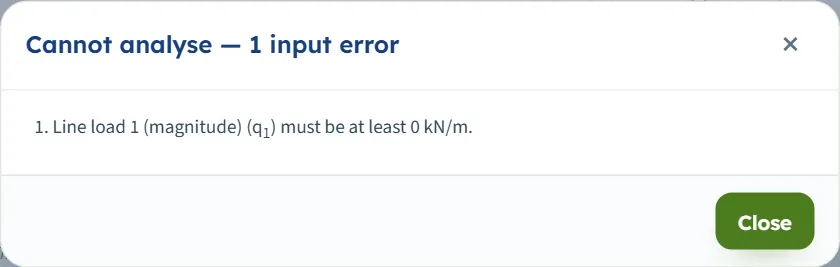
- If you press Analyze, a window titled Cannot analyse — 1 input error (or 2 input errors …) lists each message numbered.
- The limits are shown in the units of the unit system chosen.
| When | Message and what to do |
|---|---|
| Stop. A magnitude is empty | “Line load 1 (magnitude) (q1) is missing.” Enter q, or take the load out. |
| Stop. A magnitude is negative | “Line load 1 (magnitude) (q1) must be at least 0 kN/m.” Enter zero or more; give a load that points the other way a negative α instead. |
| Stop. An inclination is outside −90° to 90° | “Inclination of line load 1 from the vertical (90° = horizontal) (α1) must be at most 90°.” or “… at least -90°.” Enter an angle in that range. |
| Stop. A position is empty | “Position of line load 1 (x1) is missing.” |
| Stop. The point has no position or no depth | “Horizontal position of the point A (xA) is missing.” or “Depth of the point A (z) is missing.” |
| Stop. The depth of the point is below 0.001 m | “Depth of the point A (z) must be at least 0.001 m.” Enter a depth inside the ground. |
| Stop. The depth of the profile is below 0.1 m | “Depth of the profile (zmax) must be at least 0.1 m.” |
When more than one value is wrong the window lists them together, for example “2 input errors” for a negative load and an inclination of 100°. The number after the symbol is the number of the load: q1, α1 and x1 belong to line load 1.
Notes while you build the model
- Two loads at one position. A toast reads “A line load already stands at this position. Give the new one another position.” when you add, and “Another line load already stands at this position — the value is kept as it was.” when you change or drag a position onto a taken one.
- Results cleared. After Edit inputs a toast reads “Results cleared — the inputs can be edited.”
Good practice and common mistakes
- Use one inclined load, not two stacked ones. Two loads cannot stand at the same position, and one load of magnitude q at α gives exactly the stress of its two components.
- Mind the sign of α and of x. The horizontal part adds on the side the load pushes toward and subtracts on the other; a negative Δσz is a decrease, not an error.
- Read Δσz as an increase. It is caused by the loads alone; add the stress already in the ground.
- The loads are lines of infinite length. The stress is the same in every cross section; for a load of limited length, use a point load, strip or area module.
- The soil is one elastic half-space. For layered ground use the Westergaard modules.
- Choose zmax deep enough to see where the stress under A peaks and falls; it does not change the answer at A.
- Check the units after switching the system: type values in the units shown beside the boxes.
- Keep a record. The report is the record of an analysis; use Quick Save… or Save to file… to keep the model. The page remembers your values, but not the analysed state.
Frequently asked questions
How is the stress below a horizontal line load calculated?
By the theory of elasticity for a half-space: Δσz = 2q x z² / [π(x² + z²)²], with x the horizontal distance from the load to the point and z its depth. It is positive on the side the load pushes toward and negative on the other. For the example, a horizontal load of 10 kN/m gives 0.3030 kPa at x = 5 m, z = 4 m.
How does it handle an inclined load?
It splits the load into qV = q cos α and qH = q sin α, calculates the stress of each, and adds them. For 10 kN/m at 20° the parts are 0.2278 and 0.1036 kPa and the total 0.3314 kPa at the example point.
What sign should I give the inclination?
Positive when the horizontal component points toward +x, negative when it points toward −x. The inclination goes from −90° to 90°, where 90° is a purely horizontal load and 0° a vertical one.
Why is the stress negative at my point?
The point is on the side the horizontal component pulls away from, so the vertical stress there decreases in the elastic solution. The 3D view says so under the drawing, and the note under the Results cards says on which side a horizontal load decreases the stress.
How many loads can I add?
Up to eight, each with its own magnitude, inclination and position. No two loads may stand at the same position, and the stresses of all of them add.
Can I drag the loads and the point?
Yes. Loads are dragged along x in the Section, Contours and 3D views before Analyze; the point A in the Section and Contours views before and after Analyze, with the stress at the new place calculated at once; the dashed line in the Section and Contours views sets the depth of the profile. Everything moves in steps of 0.05 m. After Analyze the loads are locked until you press Edit inputs.
Does the depth of the profile change the answer?
No. It sets how deep the profile and its table go; the answer at A stays the same.
What values does the module accept?
A magnitude of zero or more, an inclination from −90° to 90°, any position, a depth of the point of at least 0.001 m and a depth of the profile of at least 0.1 m. Anything else stops the analysis with a message that names the value.
Which units does it use, and what are the units of the answer?
SI · kN, SI · tf or US, switchable in the header at any time, even after Analyze. The load is in kN/m, tf/m or kip/ft, the stress in kPa, t/m² or ksf, and lengths in m or ft. The example gives 0.3314 kPa, 0.03379 t/m² or 0.006921 ksf.
What do the Contours and the lines of equal stress show?
The same field of Δσz in the vertical plane through the point: the Section view as lines at fixed levels, with the blue line through the value at A, and the Contours view as colour bands on a logarithmic scale. Lines can be put over the colours with the Lines of equal stress chip.
What does the report contain?
A cover with your project details and the answer, then six parts: introduction and scope, input data, the calculation step by step, results, summary and references, with the section, profile and 3D drawings.
Does the module remember my inputs?
Yes, the loads, the point and the profile depth are kept in the browser, and the page opens again on them. The analysed state is not kept: press Analyze again. Reset to defaults brings back the example; Save to file and Quick Save keep copies.