

What the module calculates
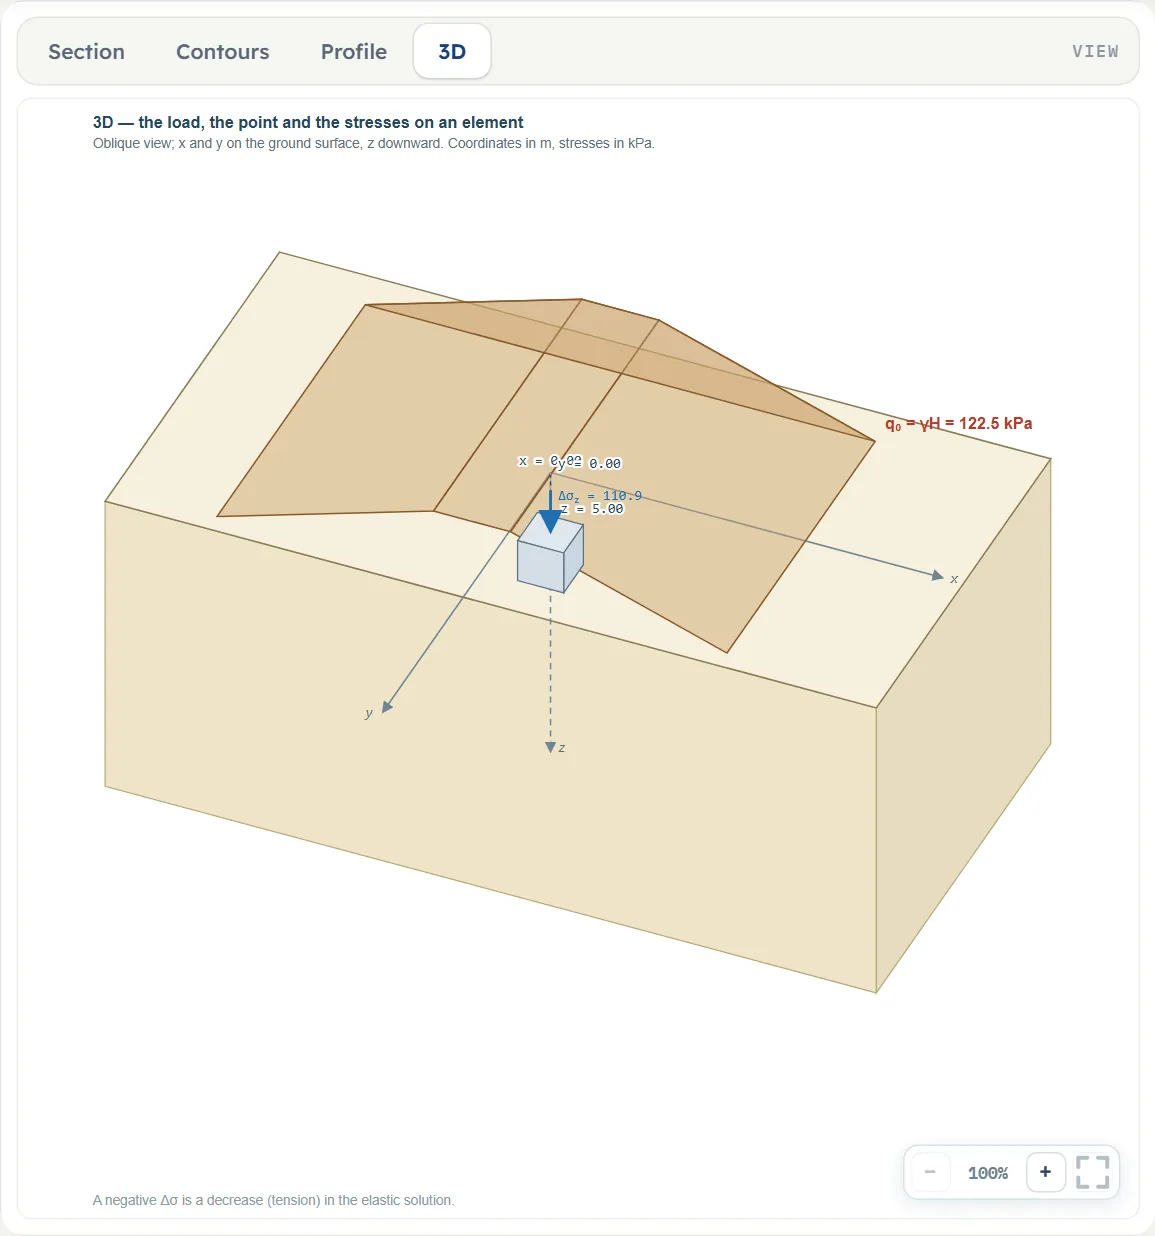
Embankment gives the increase in vertical stress at a point of the ground below one or several long embankments of trapezoidal cross section: a road or railway fill, a levee, a long stockpile. The fill is treated as a flexible load on the ground surface, equal to its weight per unit area q0 = γH under the crest and falling in a straight line to zero at the two toes. The ground is a homogeneous, isotropic, elastic half-space and the problem is plane strain: the stress is the same in every cross section along the embankment. You choose the point A by its horizontal position x and its depth z, under the fill or beside it, and the module gives Δσz there, the lines of equal stress, the colour contours, the profile with depth under A and a 3D view.
The module splits each trapezoid into a uniform strip under the crest and two strips that rise or fall linearly under the slopes, finds the stress of each with the theory of elasticity (Boussinesq, integrated across the strip) and adds the three. Under the crest the sum equals Osterberg’s (1957) influence-value form q0(I2 of the left half + I2 of the right half), and the module works that form out as a check. With several embankments the stress of each is found with its own distance from A and the stresses are added.
What you can describe
- One to eight embankments, each with its own unit weight γ, height H, crest width Bc, horizontal widths L1 and L2 of the left and right slopes, and position xc of the centre line of its crest along the x axis.
- The point A: its horizontal position x and its depth z below the ground surface.
- The depth of the profile zmax, down to which the Profile view and the table under A run.
The result is the increase caused by the embankments only; the overburden pressure of the foundation soil is not included, so add it where your design needs the total stress. The module draws the section with the lines of equal stress, the colour contours, the profile and a 3D view, writes out the working and prepares a PDF or Word report.
Which module for which load
- A fill with a flat top and sloping sides, or a triangular one (Bc = 0): this module. Slopes may differ, and one side may be vertical.
- A band of uniform pressure: Vertical strip load; a band whose pressure grows linearly across its width: Triangular strip load.
- A load that is a single line: Vertical line load or Horizontal line load.
- A load of finite length as well as width: Rectangle, Circle, any point or Influence chart for a shape of any outline; a concentrated load: Point load.
Before you start: what you need
Have these ready from your design:
| What | Notes |
|---|---|
| The unit weight γ and the height H The fill material and the section | They give the load q0 = γH under the crest. Zero or more. |
| The crest width Bc and the slope widths L1, L2 The section of the fill | Slope widths are horizontal distances from the crest edge to the toe, not slope lengths. Zero or more; at least one of the three must be above zero. |
| The position xc The layout | The place of the centre line of the crest along the x axis. With one embankment you can leave it at 0 and measure x from the centre line. |
| The point A: x and z Where you want the stress | x on the same axis as the crests (negative toward the left toe); z at least 0.001 m below the surface. |
Quick start in seven steps
- Open the module and choose the units
Open Embankment from the Stresses in a Soil Mass family. Pick SI · kN, SI · tf or US in the header; you can change it at any time.
- Enter the embankment
In Embankments the first embankment is already in the table. Press its row to change γ, H, Bc, L1, L2 and xc; or drag the fill and its four rings on the Section drawing. For another embankment fill the New embankment form and press + Add embankment.
- Place the point A
In Point A type x and z, or drag the blue point on the Section drawing.
- Set the depth of the profile
In Depth profile type zmax, or drag the dashed line at the foot of the Section drawing.
- Press Analyze
Press Analyze at the foot of the Model tab. The bar reads Analysed and the embankments lock; the point A and the profile depth stay free.
- Read the answer
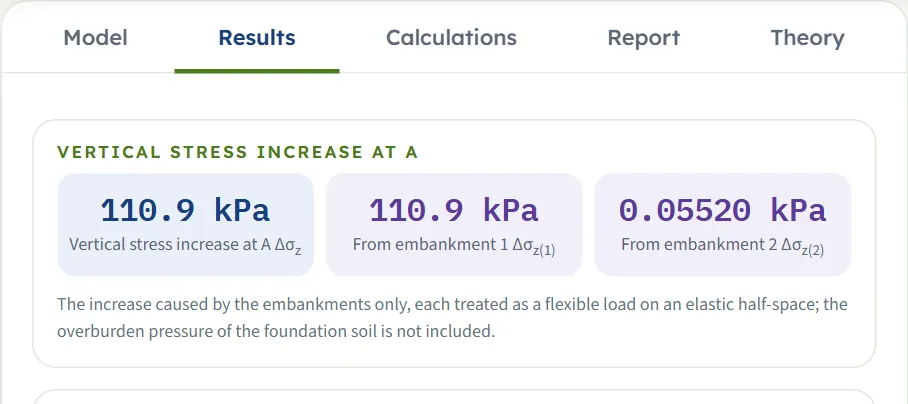
The Results tab gives Δσz at A, the influence value Δσz/q0 for one embankment, the part from each embankment for two or three, and a table of the stress against depth under A. The lines of equal stress are on the Section drawing, the colour bands in Contours.
- Move A and take the report
Drag A or change x and z: the stress there is calculated at once. The Calculations tab writes out the working; the Report tab saves a PDF or a Word file.
The screen: section, contours, profile and 3D
The layout is the one every GeoTerva module shares, described in the workspace guide. For this module the drawing has four views, chosen with the buttons above it:
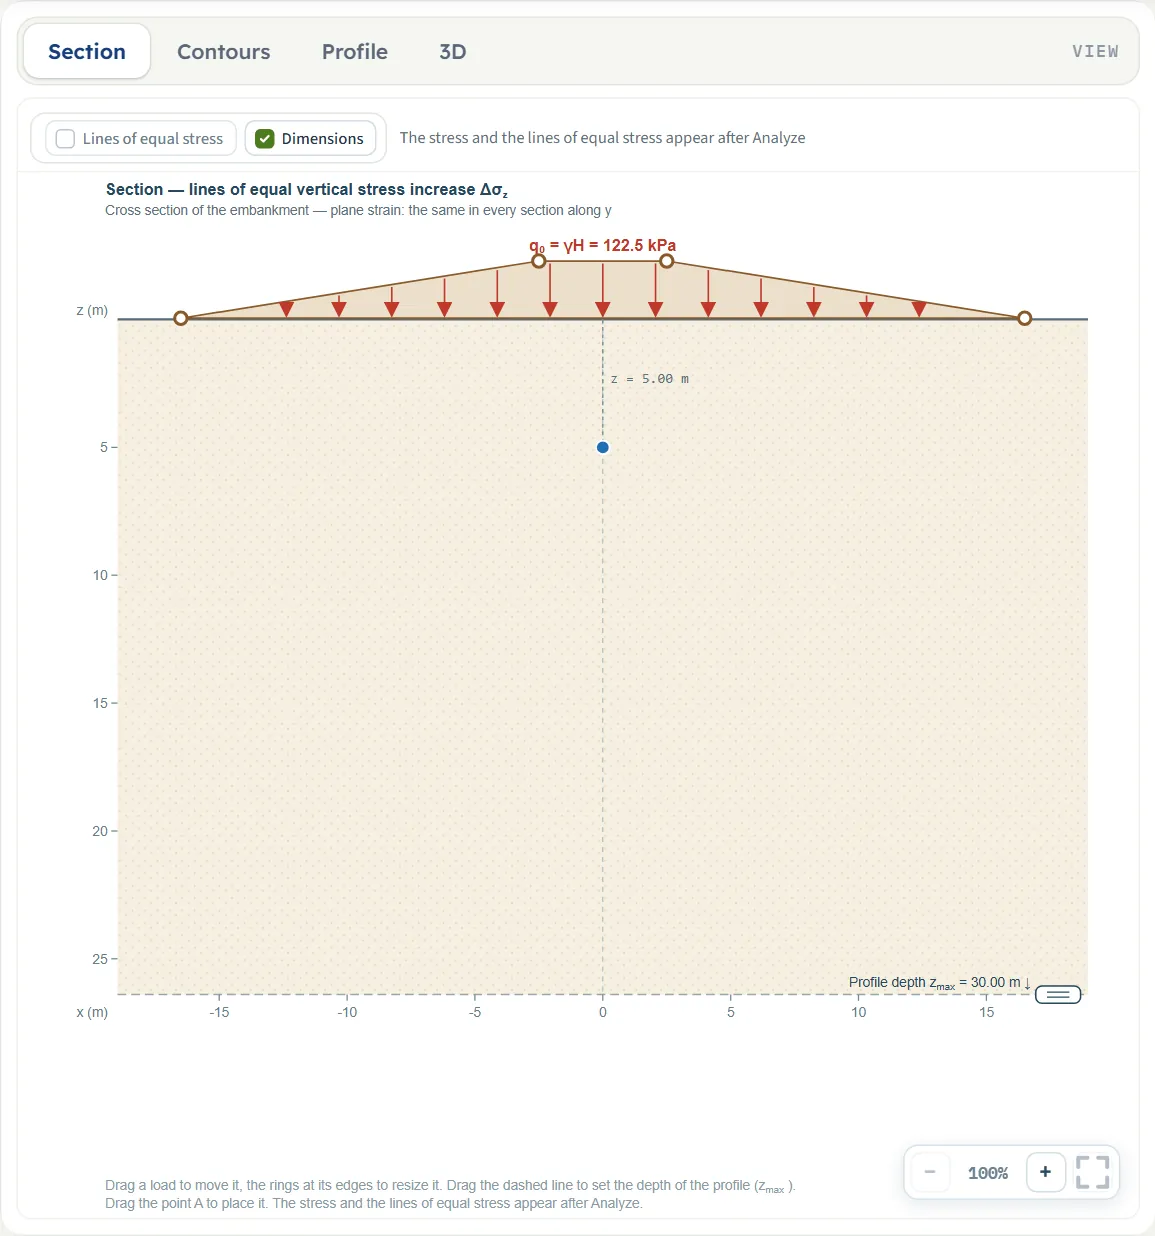
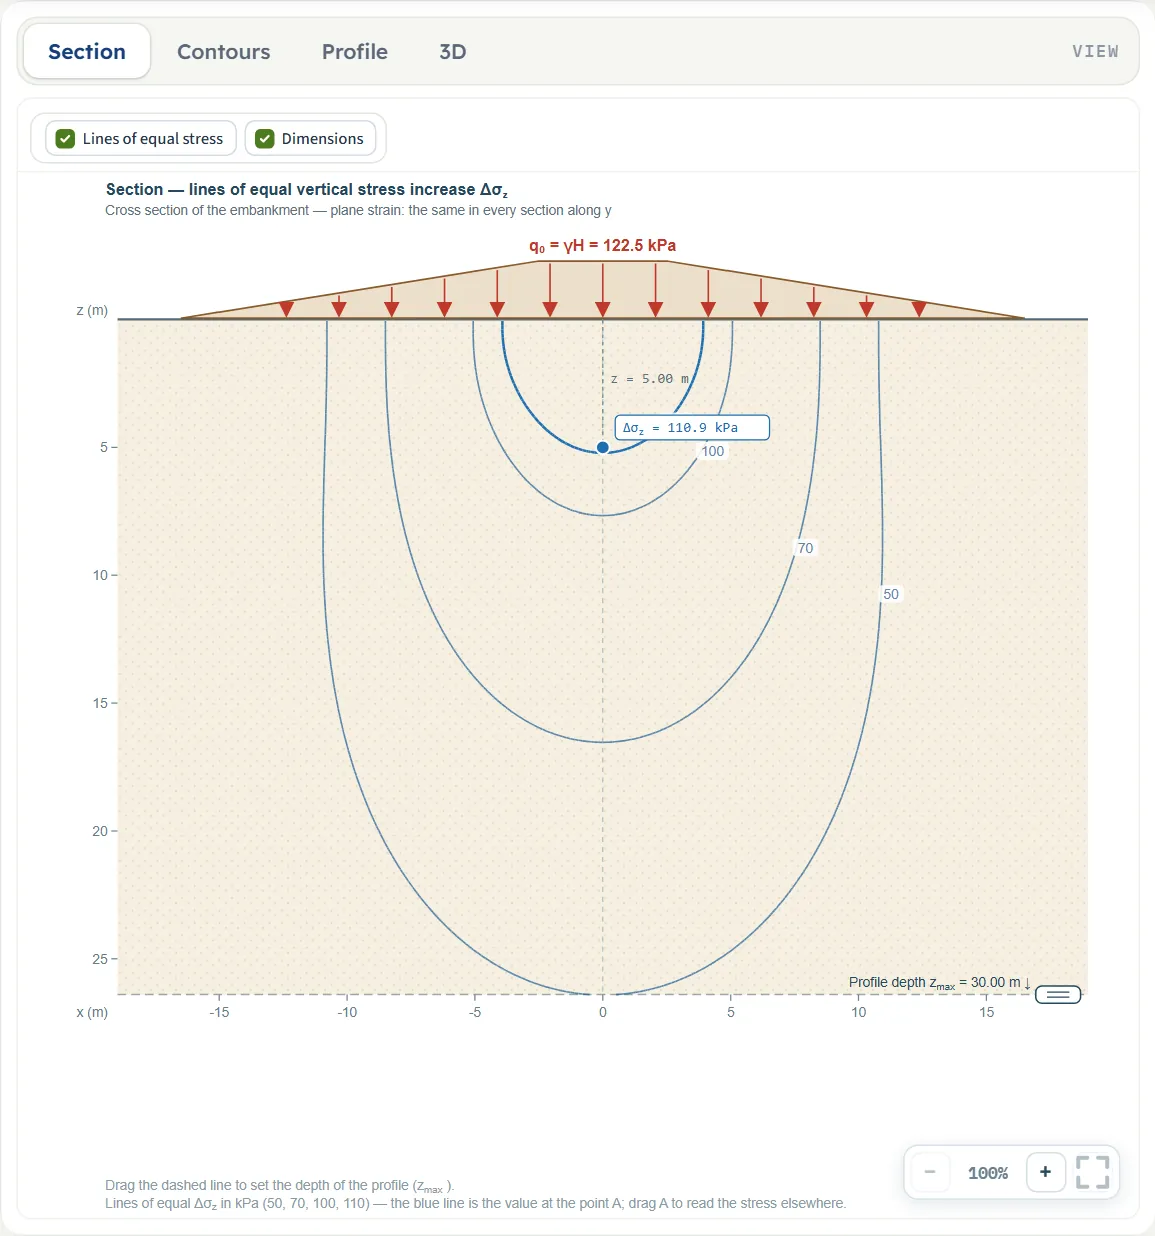
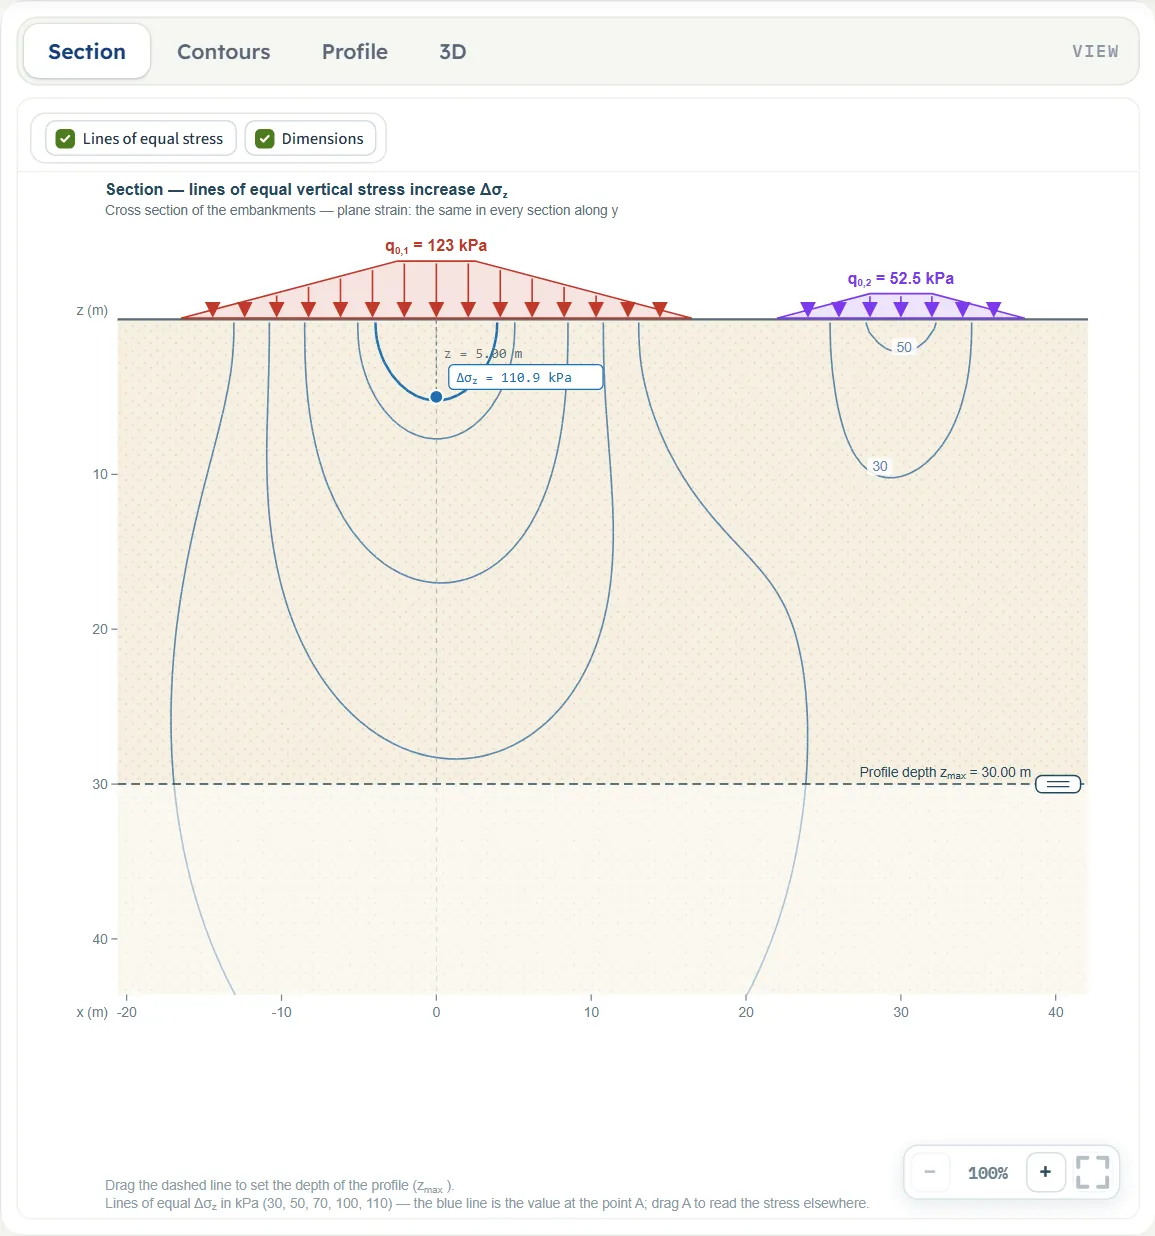
- Section is the cross section of the embankment or embankments on the ground, with the load q0 = γH written above the fill, the point A, the dimensions x and z and the dashed line of the profile depth (the dashed line sits at the bottom edge of the frame when zmax is deeper than the frame). After Analyze it adds the lines of equal stress and a label with Δσz at A.
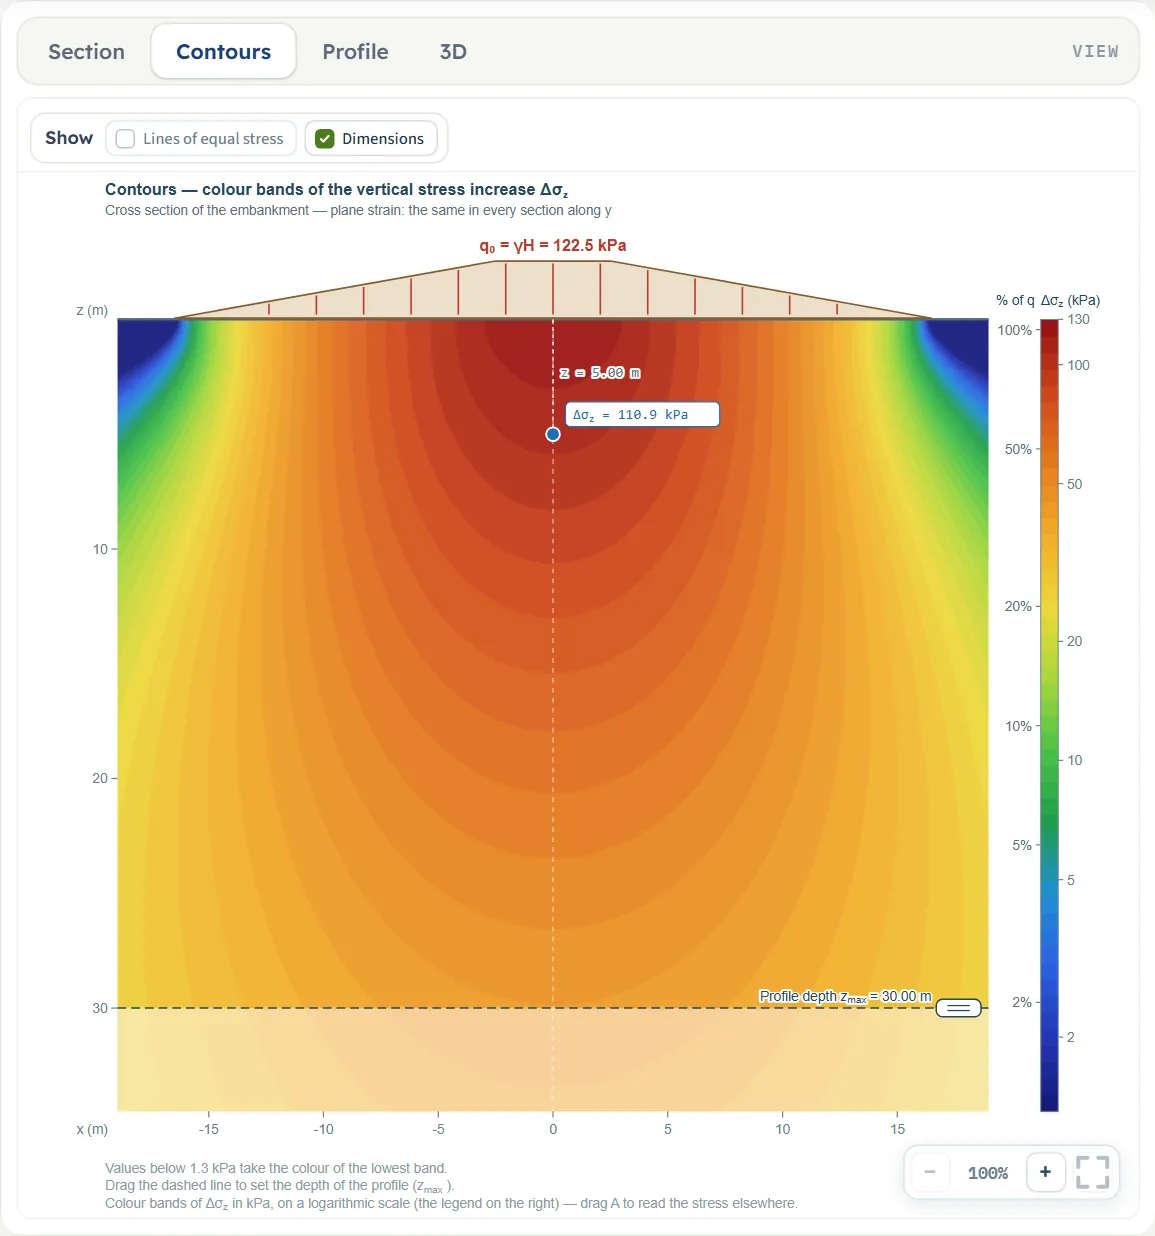
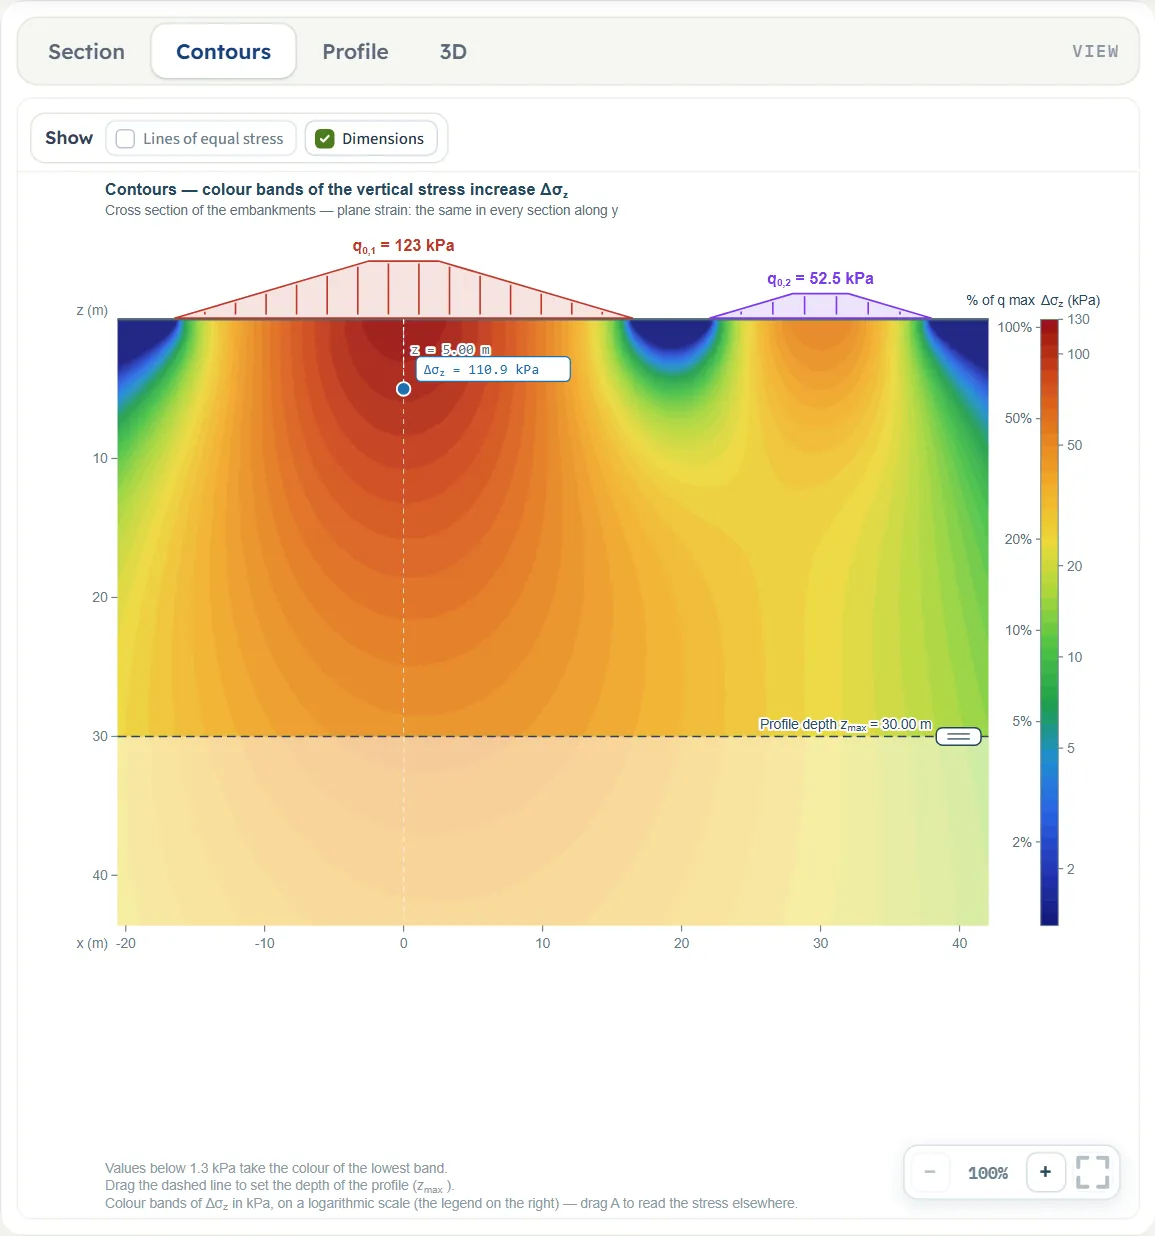
- Contours is the same section filled with colour bands of Δσz on a logarithmic scale, with a legend in kPa and in per cent of q0 (of the largest q0 when there are several embankments).
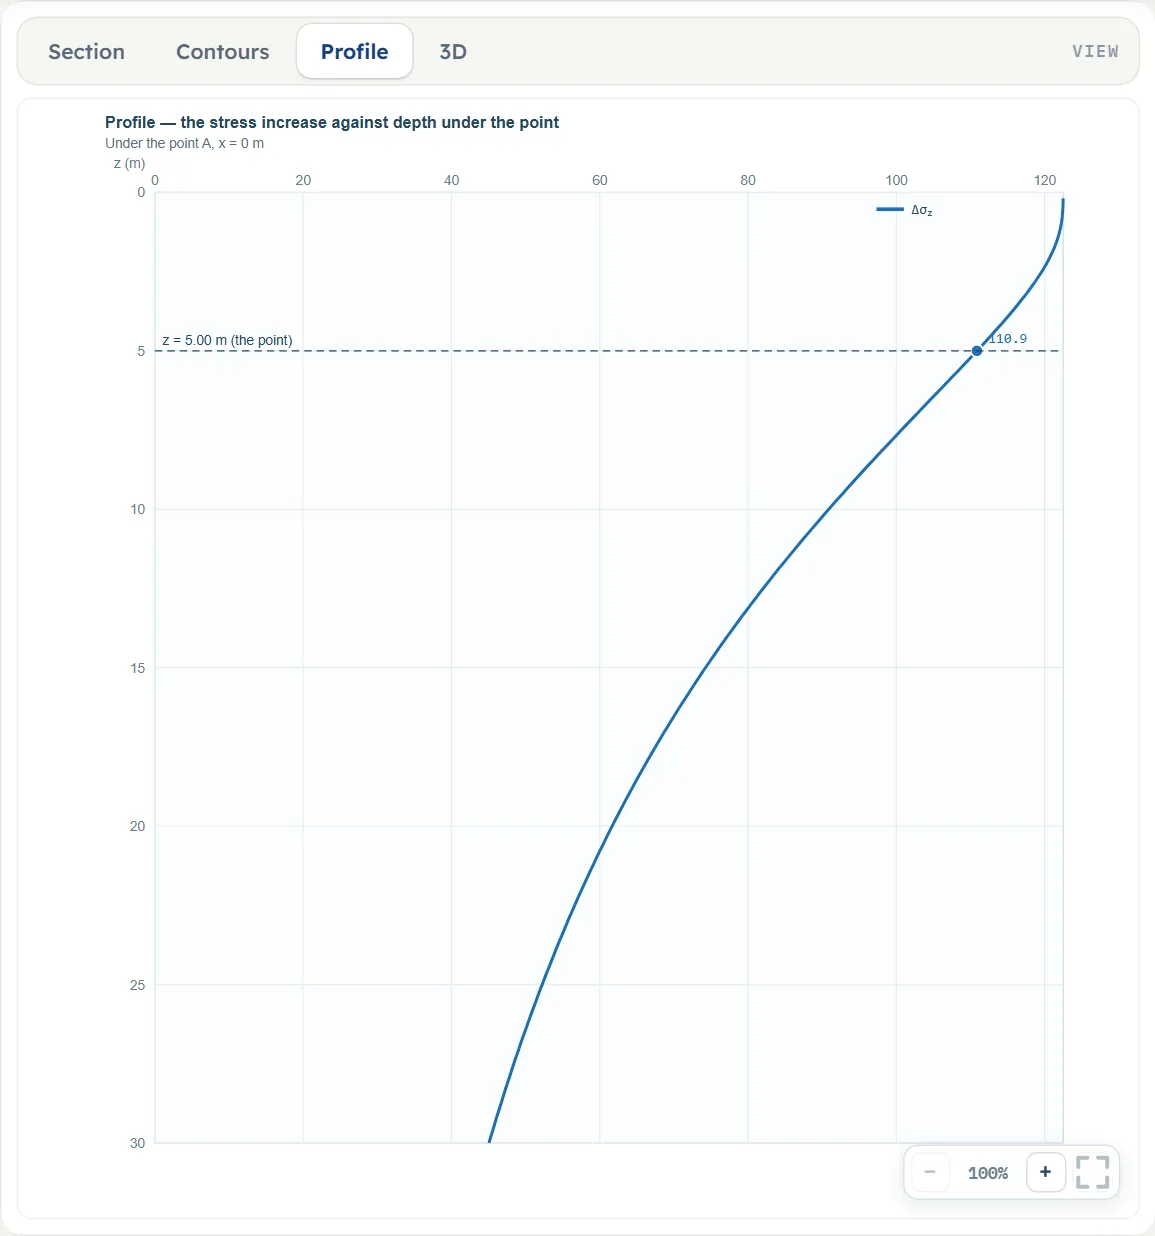
- Profile is the curve of Δσz against depth under A, with a marker at the depth of A.
- 3D is an oblique view of the fill on the ground, the axes x, y and z, and a small element at A with the stress on it.
Before Analyze the drawings follow the inputs and say “The stress and the lines of equal stress appear after Analyze” (Section), “The colour contours of the stress appear after Analyze” (Contours) or “The profile appears after Analyze”. The four rings on the fill are the handles you can pull.
The Show chips
Above the Section and the Contours drawings a bar has two chips: Lines of equal stress and Dimensions. In the Section view the lines chip is off and greyed out until you press Analyze, and then turns on; in Contours it is off by default, so that the lines can be laid over the colours. Dimensions is on by default in both. The Profile and 3D views have no chips.
Dragging on the drawing
Before Analyze two hints stand under the Section drawing: “Drag a load to move it, the rings at its edges to resize it. Drag the dashed line to set the depth of the profile (zmax).” and “Drag the point A to place it. The stress and the lines of equal stress appear after Analyze.” After Analyze they become “Drag the dashed line to set the depth of the profile (zmax).” and a line saying that the blue line is the value at the point A and that you drag A to read the stress elsewhere. What each pull does, as the module runs it:
- The fill. Drag its body sideways to move it: xc follows the pointer in steps of 5 cm; a vertical pull changes nothing. Pulling the example 3 m to the right gives xc = 3.
- A toe ring. Drag the ring at a toe to change that slope: the crest stays where it is and L1 or L2 changes. Pulling the right toe 4 m to the right changes L2 from 14 to 18; pulling it far to the left stops at L2 = 0, a vertical side. A toe can be pulled well beyond the visible part of the section (the drawing rescales); the only stop is L = 0.
- A crest ring. Drag a crest corner to change the crest width with the toe on that side held where it is: the slope takes up what the crest gives. Pulling the left crest corner 1 m to the left gives Bc = 6, L1 = 13 and xc = −0.5; pulling the right one 2 m to the right then gives Bc = 8, L2 = 12 and xc = 0.5. The crest width stops at 0, a triangular fill; there the two crest rings nearly coincide and the right one takes the pull (+1 m gave Bc = 1 with L2 reduced by 1; a pull to the left does nothing).
- Two embankments never overlap. A pull that would put the ground one covers, toe to toe, on another’s stops at the last free place and a message says “That would put embankment 1 and embankment 2 on top of one another — the value is kept as it was.” Toes that meet are allowed.
- The point A. Drag the blue point: x and z follow in steps of 5 cm. The depth stops at 0.05 m at the top and at the foot of the drawn frame at the bottom (about 26 m in the example; the frame grows when A is deep), and x at the sides of the frame, which grows with the embankments. With the example, pulling A far to the upper left gave x = −18.95 m and z = 0.05 m.
- The dashed line. Drag it up or down to set zmax; it stops at 0.5 m.
- After Analyze the embankments are locked and their rings disappear: pulling the fill changes nothing. The point A and the dashed line stay free, and so do the boxes x, z and zmax.
The 3D view has its own hint, “Drag a load over the ground to move it, the rings at its edges to resize it.” These pulls, like those of the Section view, work before Analyze only.
Zoom
Each view has −, a percentage and + at the lower right, and a button that fits the whole drawing in the pane. Zoom is a property of the drawing only: it is not saved with the model and does not change the report.
Entering the model, section by section
The Model tab has four sections: Model data, Embankments, Point A and Depth profile. Each opens when you click its title; Next and Back at the foot walk you through them, and Analyze waits below the last one. Where a unit is shown twice or three times, such as m · ft, the units are those of SI · kN, SI · tf and US in turn. Defaults are shown in SI; in US the boxes show the converted values, for example 111.403 pcf for 17.5 kN/m³.
Model data
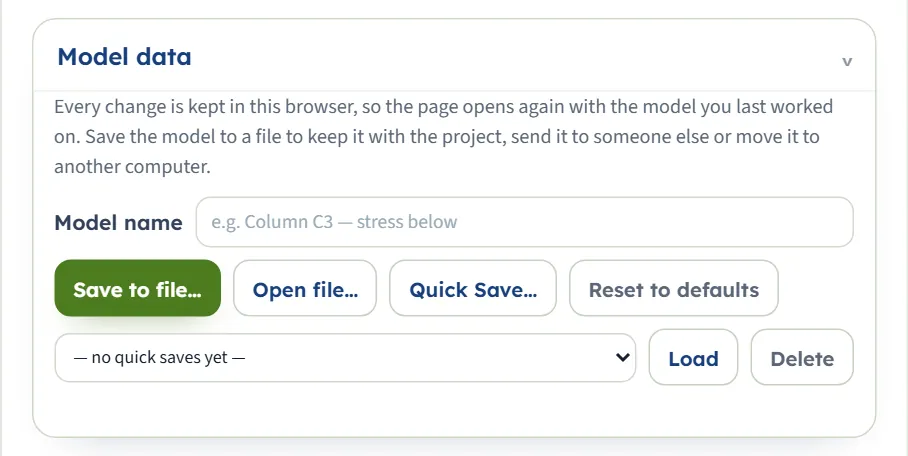
The first section holds the model name, Save to file…, Open file…, Quick Save… with its list and Load and Delete, and Reset to defaults. It works as described in the workspace guide.
Embankments
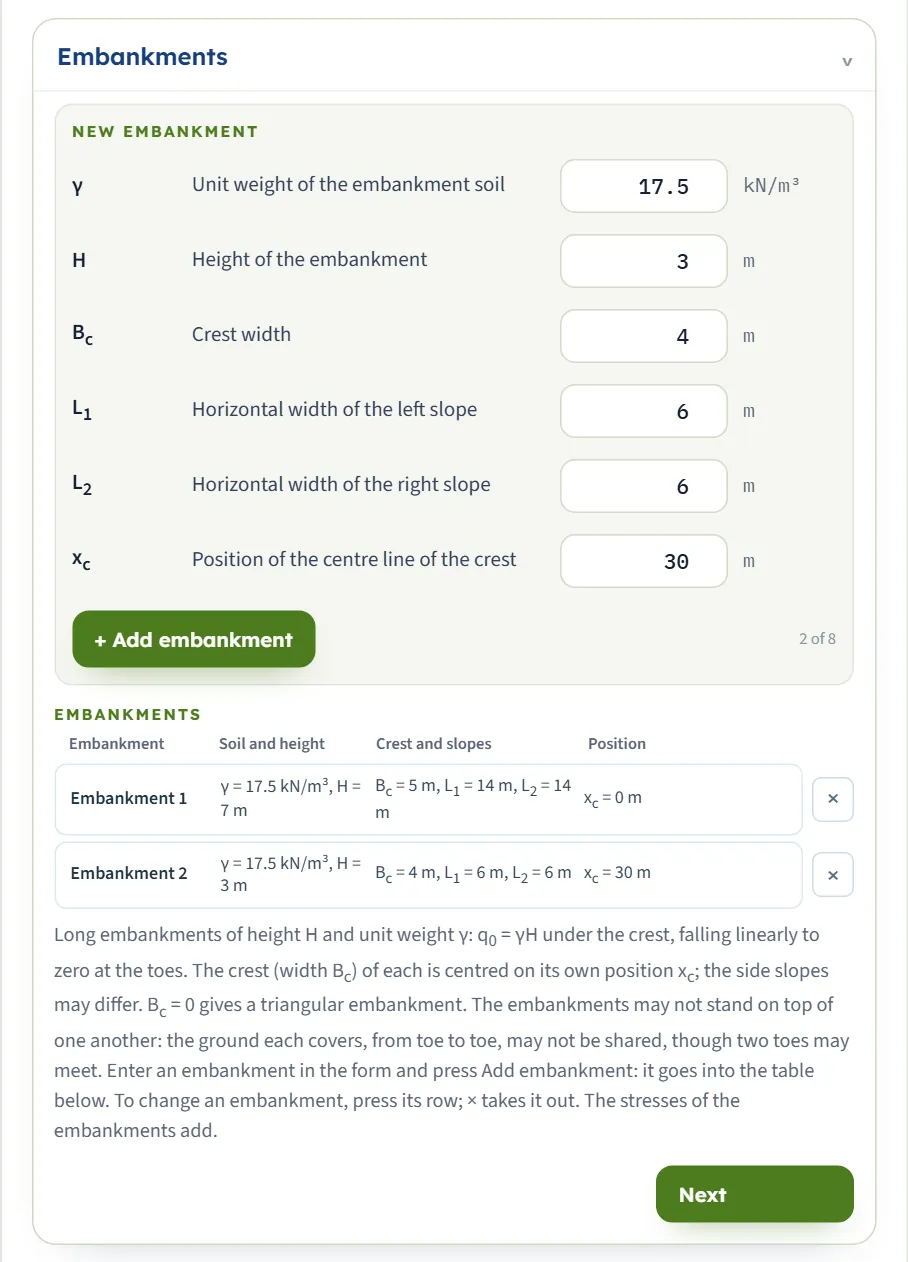
The section is a form over a table. The New embankment form takes γ, H, Bc, L1, L2 and xc; + Add embankment puts the embankment into the Embankments table, and a counter beside the button shows how many of the eight there are. The table lists each embankment with its soil and height, its crest and slopes, and its position. Press a row to change that embankment in the form (the form then reads Editing · Embankment 1 and offers Done and Delete embankment; the note says that changes apply as they are entered), or press × to take one out. The first embankment is already in the table when the module opens, and Delete embankment and × are greyed out while it is the only one. Below the table a note describes the load and the rule that embankments may not stand on one another.
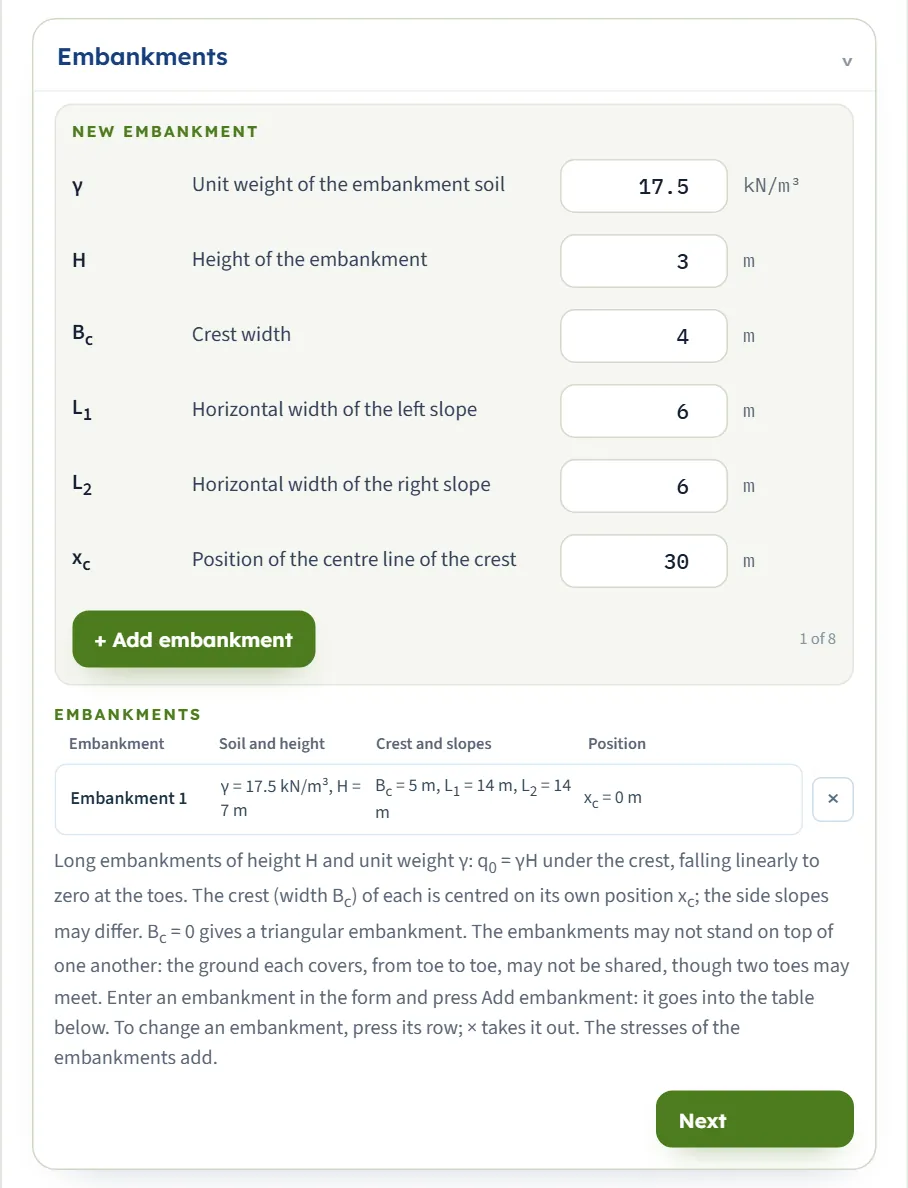
| Field | What to enter |
|---|---|
| Unit weight of the embankment soil γ kN/m³ · t/m³ · pcf · default 17.5 (first) · 17.5 (form) | Zero or more. With the height it gives q0. |
| Height of the embankment H m · ft · default 7 (first) · 3 (form) | Zero or more. A height of 0 is accepted and gives 0 kPa. |
| Crest width Bc m · ft · default 5 (first) · 4 (form) | Zero or more. 0 gives a triangular embankment. |
| Horizontal width of the left slope L1 m · ft · default 14 (first) · 6 (form) | Zero or more. The horizontal distance from the left edge of the crest to the left toe; 0 is a vertical side. |
| Horizontal width of the right slope L2 m · ft · default 14 (first) · 6 (form) | Zero or more. The same on the right. |
| Position of the centre line of the crest xc m · ft · default 0 (first) · 30 (form) | Along the x axis; any value. The form opens with 30. |
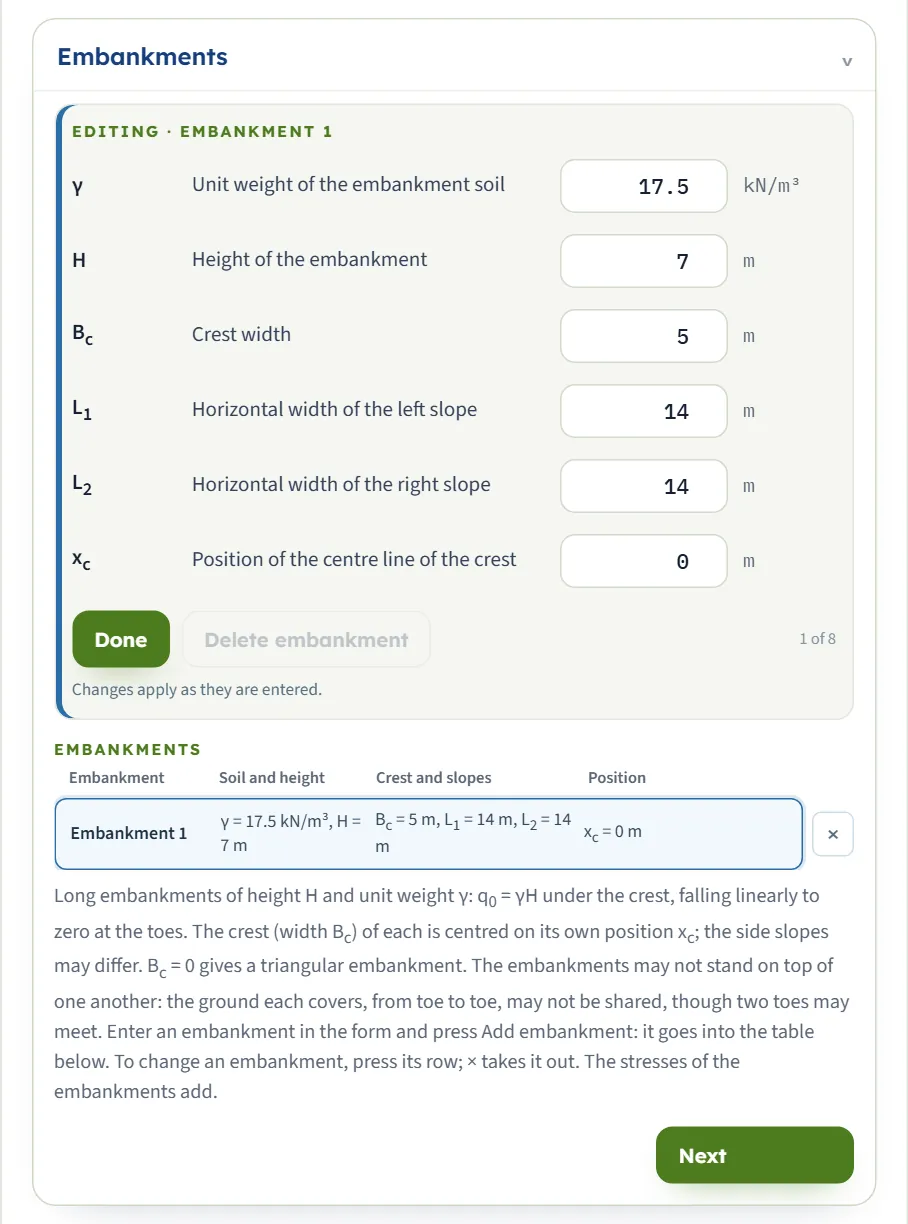
The embankments may not lie on top of one another: the ground each covers, from toe to toe, may not be shared, though two toes may meet. Adding or editing an embankment that would overlap another is refused (see Messages). The embankments are numbered in the order you add them, and the numbers name the results “From embankment 1”, “From embankment 2” and so on.
Point A
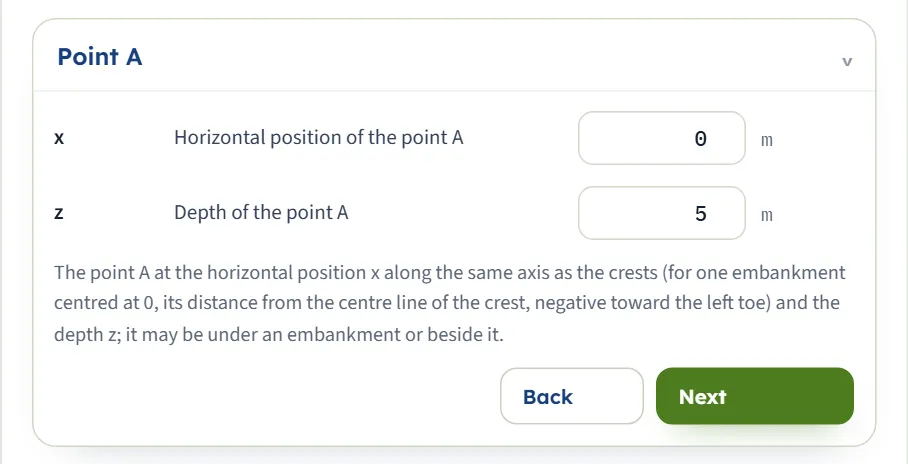
The two coordinates of the point where you want the stress. A is under the ground surface at the horizontal position x and the depth z; it may be under an embankment or beside it. The drawing shows the same distances as dimensions.
| Field | What to enter |
|---|---|
| Horizontal position of the point A x m · ft · default 0 | On the same axis as the crests; for one embankment centred at 0 it is the distance from the centre line of the crest, negative toward the left toe. Any value. |
| Depth of the point A z m · ft · default 5 | At least 0.001 m below the ground surface. |
Depth profile
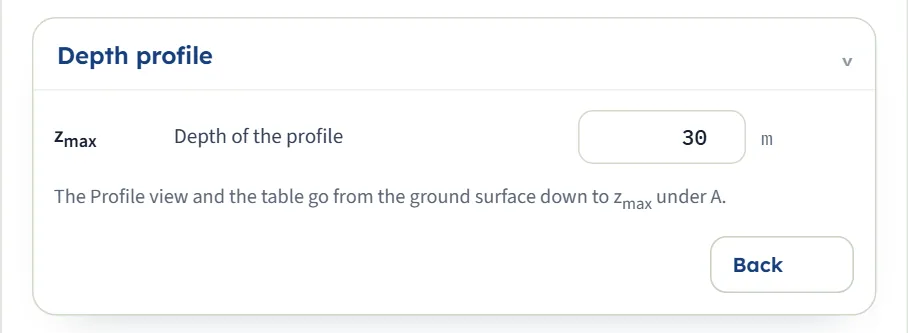
The depth down to which the Profile view and the table of the stress under A run.
| Field | What to enter |
|---|---|
| Depth of the profile zmax m · ft · default 30 | At least 0.1 m. The Profile view and the table under A go from the surface down to this depth, or to the depth of A if that is deeper. |
The shape of the fill and several embankments
There is no method to choose: the module has one solution. What you decide is the shape of each fill and how many fills there are, from 1 to 8.
The shape of one embankment
- Crest and slopes are independent. L1 and L2 can differ; a side with a width of 0 is vertical. With L1 = 0 the example gives 89.11 kPa at A, the same as with L2 = 0 (89.11 kPa), because A is on the centre line.
- Bc = 0 gives a triangular embankment. The example with Bc = 0 gives 95.75 kPa (influence value 0.7816) against 110.9 kPa with the 5 m crest.
- Slope widths are horizontal. For a slope of 1 vertical to 2 horizontal on a 7 m fill, L1 = 14 m.
- The load is q0 = γH at the crest. The module treats the fill as a load on the ground; it does not model the stiffness of the fill.
Several embankments
The stress of each embankment is found as if it were alone, with the distance x − xc of A from the centre line of its crest, and the stresses are added. This works because the ground is elastic. Each embankment has its own γ, H, crest and slopes, so a main fill and a lower berm or a second road can be put in one model.
With the example and a second embankment from the form (17.5 kN/m³, 3 m high, crest 4 m, slopes 6 m, centred at 30 m), A at x = 0, z = 5 m receives 110.9 kPa from the first and only 0.05520 kPa from the second: 110.9 kPa in all. A is 22 m from the near toe of the second embankment, so it barely feels it. Moving A to x = 19 m, between the two, gives 9.440 kPa; at x = 30 m, under the second crest, 41.25 kPa. A second embankment equal to the first, centred at 33 m so that the toes meet at 16.5 m, adds 0.2375 kPa and gives 111.1 kPa.
Which should I use?
- One embankment or several? One when the fill is one trapezoid; several when two fills stand apart, or when a berm or a stepped fill is better described by two or three trapezoids that meet at their toes.
- A band of uniform load with vertical sides is a strip, not an embankment: use Vertical strip load.
- A fill of limited length is not long enough for plane strain: use Rectangle or Influence chart.
Analyze and read the results
Press Analyze. The bar changes to Analysed — the stress at the point calculated and says “The inputs are locked. Edit inputs clears the results; the unit system can still be changed. The point A stays free: drag it on the drawing or change its coordinates, and the stress there is calculated at once.” A message appears briefly, “Analysed — see the Results tab and the Calculations.” The module stays on the Model tab: open Results for the answer. The Section view now shows the lines of equal stress.
| Card | Symbol | The example |
|---|---|---|
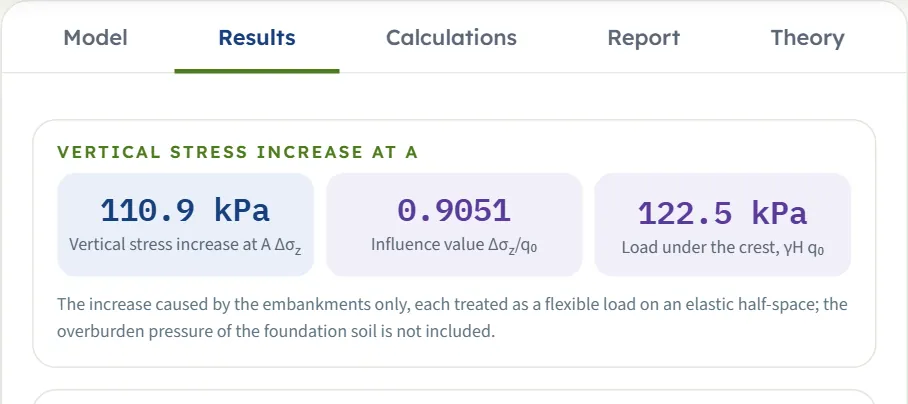
| Vertical stress increase at A | Δσz | 110.9 kPa |
| Influence value (one embankment) | Δσz/q0 | 0.9051 |
| Load under the crest (one embankment) | q0 | 122.5 kPa |
| From embankment k (two or three) | Δσz(k) | part of the total from embankment k |
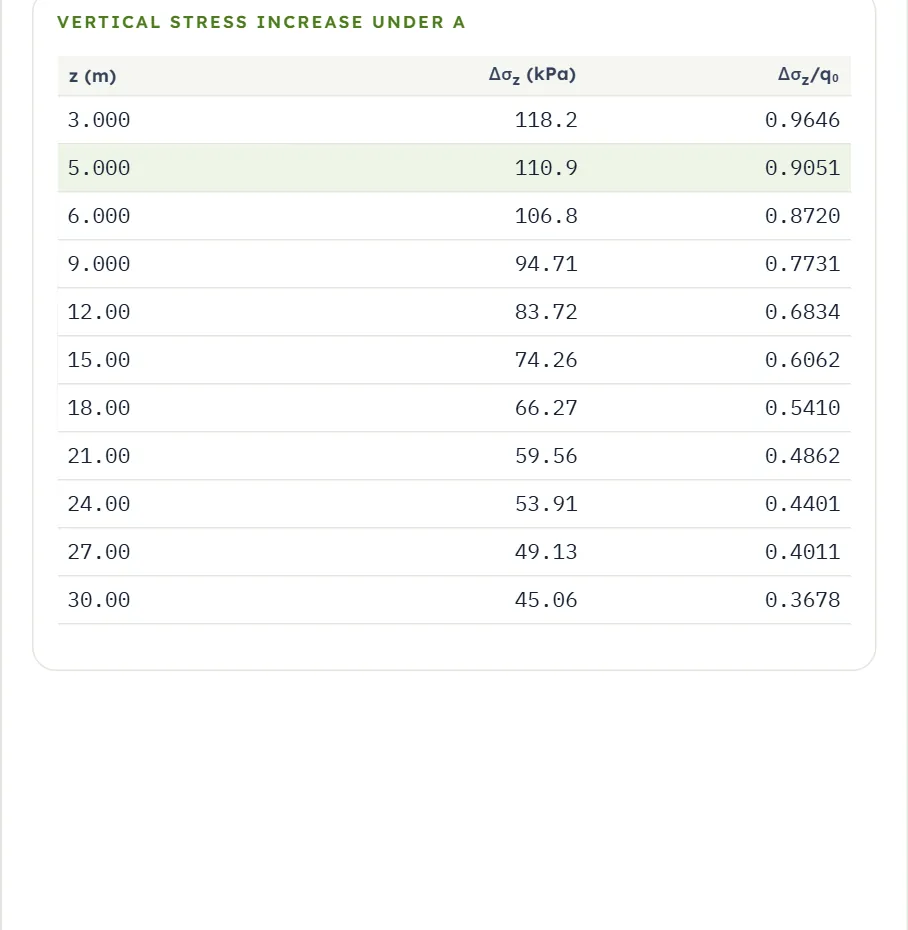
Below the cards a Values, step by step table lists the steps of the Calculations tab with their values, and the Vertical stress increase under A table gives z, Δσz and, for one embankment, Δσz/q0 at ten equal steps of zmax/10 down to zmax (the first row is at zmax/10, 3.000 m in the example), with the row of A inserted and highlighted: 11 rows unless A falls on a step. With several embankments the ratio column is left out. With two or three embankments each part has its own card; with more, the parts are listed one per line under the total card.
Using the numbers
- The result is an increase, not the total stress: add the overburden pressure of the soil above A for the total vertical stress.
- The influence value Δσz/q0 is the part of the pressure under the crest that reaches A. It is 1 at the surface under the crest and falls with depth and with distance from the fill.
- Values are rounded where they are drawn, so the last digit of a figure on the drawing can differ by one from the card.
- Change x or z after Analyze and everything follows at once; to change an embankment, press Edit inputs, which unlocks the embankments and clears the results.
- Changing the unit system after Analyze re-states the cards and the report without a new run. The drawings keep their labels in m and kPa.
Warnings and notes
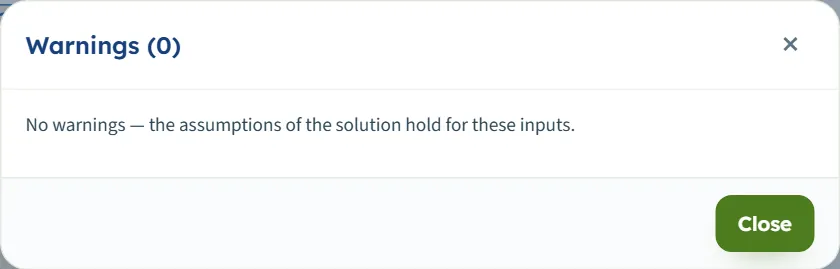
The bar carries a Warnings (0) button. It opens a window that says “No warnings — the assumptions of the solution hold for these inputs.” Every run of this manual that the module accepted, from the default to eight embankments, gave no warning.
The Calculations tab, the report and the Theory tab
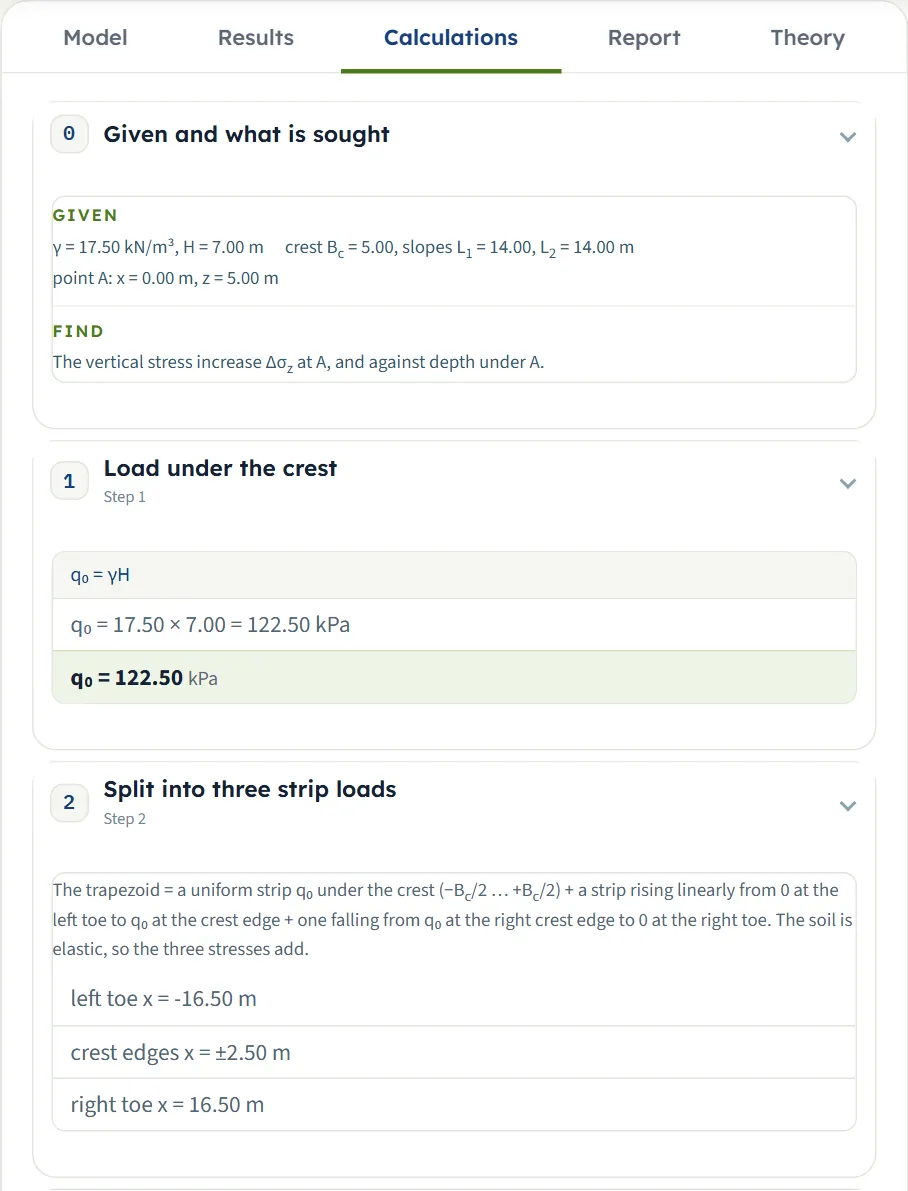
The Calculations tab opens with Given and what is sought and then writes out the working in numbered steps, ending with the answer. For one embankment:
- Load under the crest — q0 = γH with your numbers.
- Split into three strip loads — the trapezoid as a uniform strip under the crest plus a rising and a falling strip under the slopes, with the toes and crest edges measured from the centre line of the crest.
- Crest strip, Left slope and Right slope — the stress of each part with its ratio to q0 (the slope strips only when their width is above zero).
- Sum — the three parts added, and, when A is under the crest, the check with Osterberg’s form: the I2 of the left and right halves and q0(I2 left + I2 right).
- Stress increase against depth — the same sum down the vertical line through A, as the table of the Results tab, with the row of A marked.
With several embankments there is one step for each, “Stress from embankment k”, with its own distance x − xc, its toes and the three parts, then a Superposition step that adds them, then the depth table.
The report
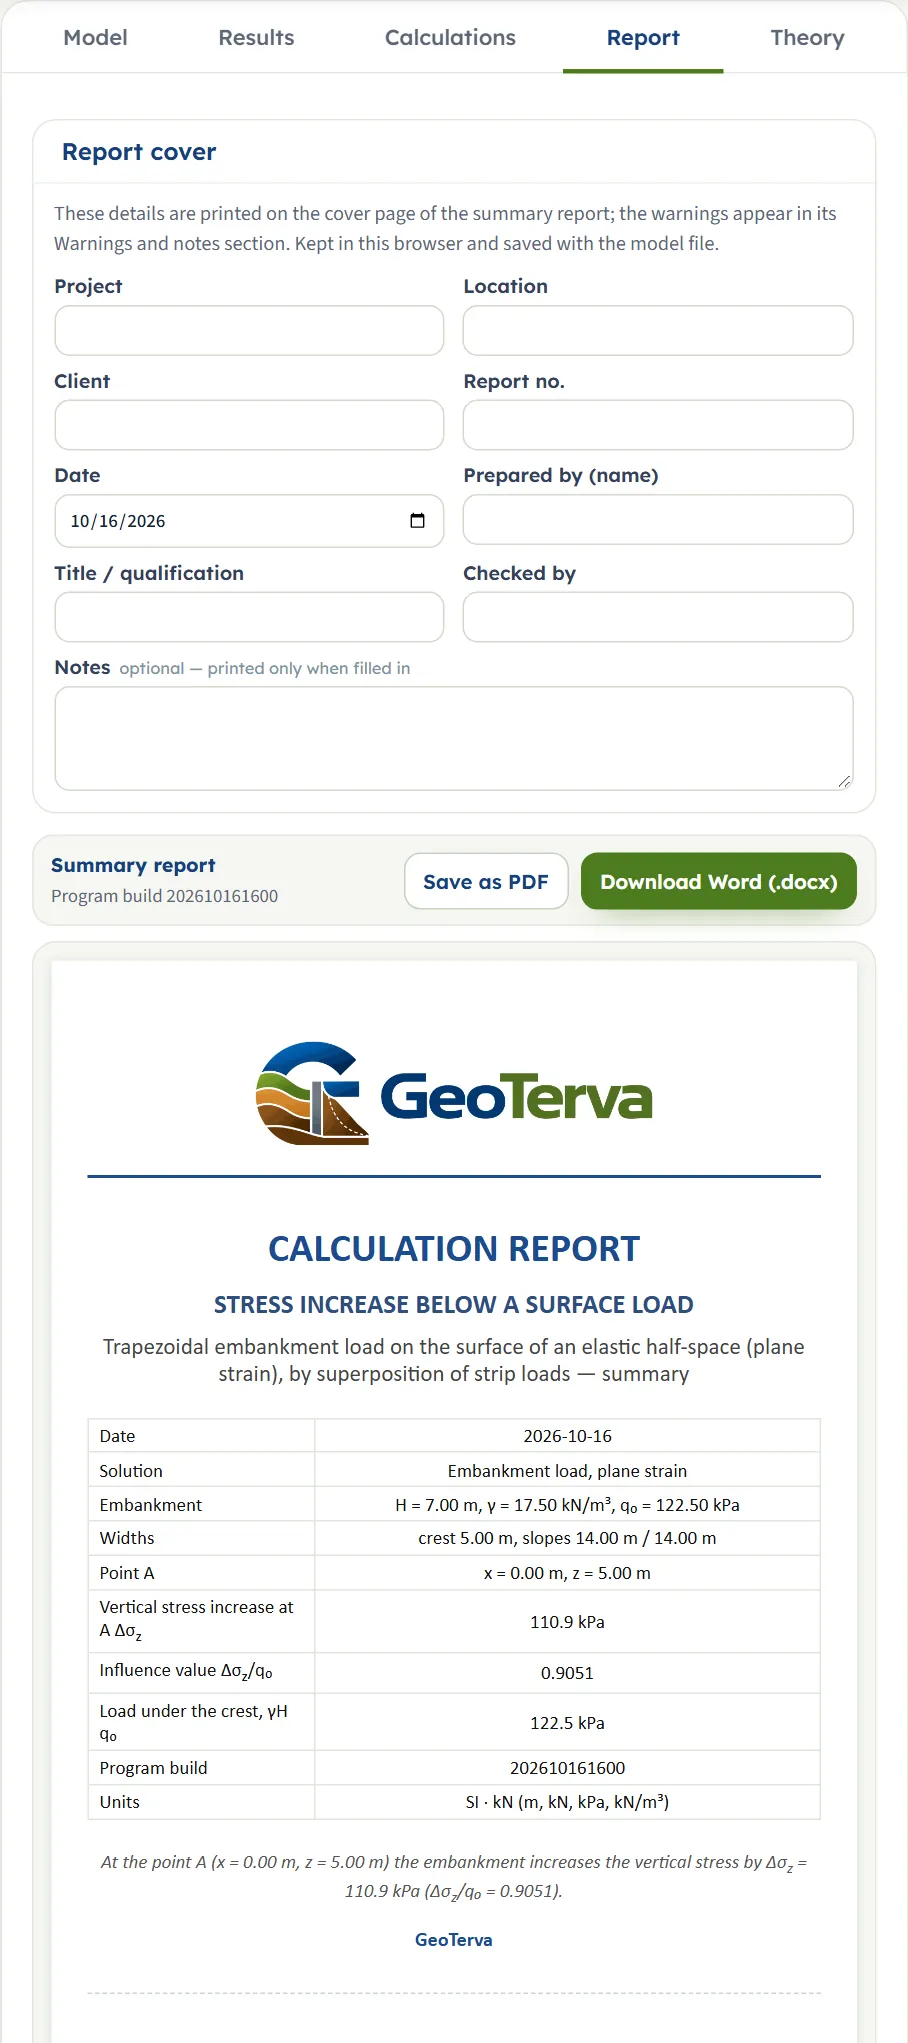
In the Report tab fill in the cover (project, location, client, report number, date, prepared by, title or qualification, checked by, and optional notes). The details are kept in this browser and saved with the model file. Save as PDF and Download Word (.docx) produce the summary report; the preview below the buttons is the report itself.
The report has six parts: 1 Introduction and scope, 2 Input data, 3 Calculation, 4 Results, 5 Summary and 6 References. It carries three drawings, the Section with the lines of equal stress, the Profile and the 3D view, and states the units used.
The Theory tab
The Theory tab has five sections: Scope and assumptions, Osterberg’s solution, Superposition of strips, Worked example and References. Each opens when you click its title (Open all and Close all open or close them together), and the figures in it are computed from the equations.
Worked example: the module’s own example
The module opens on this example, so you can follow the numbers on your own screen.
| Section | Input | Value |
|---|---|---|
| Embankments | Embankment 1 | γ = 17.5 kN/m³; H = 7 m; Bc = 5 m; L1 = L2 = 14 m; xc = 0 |
| Point A | Position | x = 0; z = 5 m |
| Depth profile | Depth | zmax = 30 m |
Step 1: the load
q0 = γH = 17.5 × 7 = 122.5 kPa. The crest edges are at ±2.5 m and the toes at ±16.5 m from the centre line.
Step 2: the three parts
A is on the centre line, 5 m deep. The crest strip (width 5 m, 2x/B = 0, 2z/B = 2) gives Δσz/q0 = 0.5498, so 67.35 kPa. Each slope strip gives Δσz/q0 = 0.1776, so 21.76 kPa, the same for both sides because A is on the centre line.
Step 3: the check under the crest
A is under the crest, so the Calculations tab also works out Osterberg’s form for the two halves: for each half the width of crest on that side is 2.5 m and the slope is 14 m, giving I2 = 0.4525 for each, and q0(I2 + I2) = 122.5 × 0.9051 = 110.87 kPa, the same value. A separate calculation that adds up Boussinesq line loads across the whole trapezoid gives 110.87 kPa as well. The depth table gives 118.2 kPa at 3 m, 110.9 kPa at 5 m and 45.06 kPa at 30 m.
Other unit systems
The same fill in SI · tf, with γ = 1.75 t/m³ (the other values unchanged), has q0 = 12.25 t/m² and gives 11.09 t/m² and the influence value 0.9051. In US the default example, a 2.558 ksf load, gives 2.316 ksf: 110.87 kPa is 2.316 ksf. A hand check with round US numbers: γ = 110 pcf, H = 20 ft, Bc = 15 ft, L1 = L2 = 40 ft, A at x = 0, z = 15 ft gives q0 = 2.2 ksf; an independent sum of line loads gives 1.982 ksf, and the module gives 1.982 ksf (influence value 0.9009).
How each input changes the answer
Each row changes one thing in the example (one embankment of γ = 17.5 kN/m³, H = 7 m, Bc = 5 m, L1 = L2 = 14 m, xc = 0, A at x = 0, z = 5 m, q0 = 122.5 kPa) and runs the module again, in SI · kN. The numbers are the ones the module gives, and a separate calculation that adds up Boussinesq line loads across the trapezoid agrees with every row.
| Change | Δσz (kPa) | Δσz/q0 |
|---|---|---|
| The example | 110.9 | 0.9051 |
| γ = 20 kN/m³ More weight, more stress; the ratio is unchanged | 126.7 | 0.9051 |
| γ = 10 kN/m³ Proportional to γ | 63.36 | 0.9051 |
| H = 3.5 m Half the height, half the stress, with the slopes still 14 m wide | 55.44 | 0.9051 |
| H = 14 m Twice the height, twice the stress | 221.7 | 0.9051 |
| Bc = 0 (triangular) Less load near the centre line | 95.75 | 0.7816 |
| Bc = 10 m A wider crest puts more load over A | 117.1 | 0.9562 |
| Bc = 20 m The ratio approaches 1 | 120.9 | 0.9867 |
| L1 = 0 (vertical left side) A loses the load of the left slope | 89.11 | 0.7275 |
| L1 = 28 m A longer slope adds a little | 113.6 | 0.9277 |
| L2 = 7 m A steeper right slope lowers the stress | 106.5 | 0.8691 |
| xc = 5 m A is 5 m from the centre line of the crest | 93.80 | 0.7657 |
| xc = −5 m The same as xc = 5: the section is symmetric | 93.80 | 0.7657 |
| x = 2.5 m (under the crest edge) Little lower than on the centre line | 106.4 | 0.8689 |
| x = 7 m (under a slope) The stress falls under the slope | 79.91 | 0.6523 |
| x = 16.5 m (under the toe) About a tenth of q0 | 13.17 | 0.1075 |
| x = 25 m (8.5 m beyond the toe) Close to nothing beside the fill | 1.032 | 0.008420 |
| z = 0.01 m At the surface under the crest the stress equals q0 | 122.5 | 1.000 |
| z = 1 m Near the surface the stress approaches q0 | 122.2 | 0.9978 |
| z = 2.5 m The stress falls slowly under a wide fill | 119.6 | 0.9765 |
| z = 10 m It falls with depth | 90.88 | 0.7419 |
| z = 20 m Still half of q0 at 20 m | 61.67 | 0.5034 |
Two other changes together: slopes of 7 m on both sides give 102.1 kPa; a very wide flat fill (Bc = 40 m, slopes 1 m) gives 121.8 kPa, an influence value of 0.9942.
The pattern follows the solution. The stress is proportional to γ and H together (q0) when the widths are fixed; it is highest under the crest and falls with depth and with distance from the fill; and with z near zero it equals q0 under the crest and tends to zero beyond the toes. Depth is not a simple fraction of q0 because the slopes keep adding load as the point goes deeper. The depth of the profile zmax changes the table and the Profile view but not the stress at A: 110.9 kPa with zmax = 15 m, and also 110.9 kPa with zmax = 2 m, a depth the module extends to the depth of A.
Messages: when the module stops, and what it notes
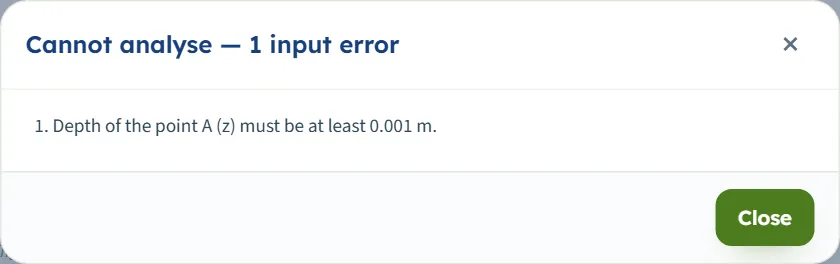
The module checks the numbers it needs before it calculates. When an input cannot be used, press Analyze and a window titled Cannot analyse — 1 input error (or 2 input errors …) lists each message and the box of an out-of-range value is marked in red (an empty box is only named in the message); nothing is calculated.
| When | Message and what to do |
|---|---|
| γ is negative | “Unit weight of the embankment soil of embankment 1 (γ1) must be at least 0 kN/m³.” Enter zero or more. |
| H is negative | “Height of embankment 1 (H1) must be at least 0 m.” Enter zero or more. |
| Bc is negative | “Crest width of embankment 1 (Bc,1) must be at least 0 m.” Enter zero or more; L1 and L2 give the same kind of message. |
| A box is empty | “Height of embankment 1 (H1) is missing.” Fill the box (the message names the box). An empty x gives “Horizontal position of the point A (x) is missing.”. |
| z is 0 | “Depth of the point A (z) must be at least 0.001 m.” Enter a depth of at least 0.001 m. |
| zmax is 0 | “Depth of the profile (zmax) must be at least 0.1 m.” Enter a depth of at least 0.1 m. |
| Bc, L1 and L2 are all 0 | A second kind of window, “Cannot analyse — a condition of the solution is not met”: “The embankment has no width. The crest and both slopes are zero. Enter the crest width or the slope widths.” Nothing is calculated. |
| A new embankment would overlap another | A message appears briefly: “The new embankment would lie on embankment 1 — they cannot overlap. Give it another position or width.” The embankment is not added. |
The messages use the numbered names of the embankments, such as “embankment 1” and “Bc,1”, even when there is only one, and the limits in the units of the unit system chosen. When you type a position or width into an embankment already in the table and it would put two on one another, a message appears briefly: “That would put embankment 1 and embankment 2 on top of one another — the value is kept as it was.” and the value stays as it was. An embankment whose toe just meets the toe of another (a second one centred at 24.5 m in the example) is accepted. At eight embankments + Add embankment is greyed out and the counter reads 8 of 8.
Notes and warnings
With every input inside its limits the module calculates, and the Warnings window reads “No warnings — the assumptions of the solution hold for these inputs.” A height of 0 is accepted and gives 0 kPa. A crest of 0.001 m gives 95.75 kPa, the same as a triangular fill. Large values are accepted: γ = 1,000,000 kN/m³ with H = 1000 m gives 905,098,248 kPa at A.
Good practice and common mistakes
- Use the module for a long fill. Plane strain means the fill is long compared with the depths you ask about; for a short fill use Rectangle or Influence chart.
- Enter horizontal slope widths. A 1:2 slope on a 7 m fill is L = 14 m, not the 15.65 m length of the slope.
- Take H from the ground surface to the crest. The load q0 = γH is the weight of the whole fill; if part of the fill sits in an excavation, enter the net height that loads the ground.
- Mind the axis. x and every xc are on the same axis; a point to the left of a symmetric fill gives the same as one the same distance to the right.
- Do not overlap embankments. They may meet at toes but not share ground; describe a stepped fill as embankments that meet.
- Add the overburden. The result is the stress increase; for the total vertical stress add the soil weight above A.
- Read the profile with the width of the fill in mind. Under the centre line of the example the stress is still 50 per cent of q0 at 20 m, because the fill is 33 m wide at its base.
- Place A with the drawing, then type exact values. Dragging snaps to 5 cm; type the coordinates when you need a given place.
- Check the units after switching the system: type values in the units shown beside the boxes.
- Keep a record. The report is the record of an analysis; use Quick Save… or Save to file… to keep the model.
Frequently asked questions
How is the stress below an embankment calculated?
The module splits the trapezoid into a uniform strip under the crest and two strips that rise linearly from zero at the toes to q0 at the crest edges, finds the vertical stress of each with the theory of elasticity and adds them. For the module’s example it gives 110.9 kPa at A, and under the crest the same value follows from Osterberg’s influence-value form.
What is the load under the crest?
q0 = γH, the unit weight times the height of the fill: 17.5 × 7 = 122.5 kPa for the example. It acts over the crest and falls linearly to zero at each toe.
What is the influence value Δσz/q0?
It is the stress increase divided by q0, the part of the load under the crest that reaches A. It is 1 at the surface under the crest. The module gives it for one embankment; with several it gives the stress of each.
Does the result include the weight of the soil?
No. It is the increase caused by the embankments only. Add the overburden pressure of the soil above A for the total vertical stress.
Can I describe a triangular embankment or one with a vertical side?
Yes. A crest width of 0 gives a triangular fill, and a slope width of 0 gives a vertical side. At least one of the crest and the two slopes must have a width above zero, or the module stops with “The embankment has no width.”
How many embankments can I add, and can they overlap?
Up to eight, each with its own γ, H, Bc, L1, L2 and xc. They may meet at their toes but not share ground; the module refuses an embankment that would lie on another. The stresses add.
Can I drag the embankment and the point on the drawing?
Yes. Drag the body to move it, a toe ring to change a slope, a crest ring to change the crest width with the toe held, the blue point to place A and the dashed line to set the depth of the profile; they move in 5 cm steps. After Analyze the embankments are locked, but A and the dashed line stay free.
What do the lines of equal stress show?
Each line joins the points of the section with the same Δσz, labelled in kPa; the line through A is blue. Switch them on and off with the Lines of equal stress chip. The Contours view shows the same stress as colour bands on a logarithmic scale.
What values does the module accept?
γ, H, Bc, L1 and L2 zero or more, z at least 0.001 m, zmax at least 0.1 m, and x and xc any value. Anything else stops the analysis with a message that names the value.
Which units does it use, and what are the units of the answer?
SI · kN, SI · tf or US, switchable in the header at any time, even after Analyze. Stresses are in kPa, t/m² or ksf, unit weight in kN/m³, t/m³ or pcf, and lengths in m or ft. The default example gives 110.9 kPa, or 2.316 ksf; the same fill typed as γ = 1.75 t/m³ gives 11.09 t/m².
What does the report contain?
A cover with your project details and the answer, then six parts: introduction and scope, input data, the calculation step by step, results, summary and references, with the section, profile and 3D drawings. It is saved as a PDF or a Word file once the model is analysed.
Does the module remember my inputs?
Yes. Your values are always kept in the browser, and the page opens again on the model you last worked on; the analysed state is kept as long as you have not changed x, z or zmax after Analyze. Reset to defaults brings back the example; Save to file and Quick Save keep copies.